搭建MCP服务器
在本教程中,我们将构建一个简单的 MCP 天气服务器并将其连接到主机 Claude for Desktop。
我们将要构建什么
我们将构建一个公开两个工具的服务器:get_alerts 和 get_forecast。然后我们将服务器连接到 MCP 主机(在本例中为 Claude for Desktop):
MCP 核心概念
MCP 服务器可以提供三种主要类型的功能:
本教程将主要关注工具。
固定示例与 Inspector 验收
本页引用的官方天气服务器示例固定到 quickstart-resources revision 38e14ca4ce362d27dfaaa498f3b4592bea4c6710。需要运行完整示例时,先获取该 revision:
git clone https://github.com/modelcontextprotocol/quickstart-resources.git
cd quickstart-resources
git checkout 38e14ca4ce362d27dfaaa498f3b4592bea4c6710
完成对应语言的依赖安装和构建后,主验收使用 MCP Inspector。以对应语言章节给出的服务器命令替换占位符:
npx @modelcontextprotocol/inspector <server-command> [server-args...]在 Inspector 中确认 tools/list 返回 get_alerts 和 get_forecast,分别执行一次有效调用,并用缺失必填参数的请求确认错误路径。该流程可验证服务器启动、工具发现、调用结果和输入校验,不需要配置桌面客户端或调用付费模型。各语言章节中的 Claude for Desktop 步骤用于可选的宿主集成验证。
Python
让我们开始构建我们的天气服务器! 您可以在这里找到我们将要构建的完整代码。
必备知识
本快速入门假设您熟悉:
- Python
- Claude 等 LLM
MCP 服务器日志记录
实现 MCP 服务器时,请注意如何处理日志记录:
对于基于 STDIO 的服务器: 切勿写入 stdout。写入 stdout 会损坏 JSON-RPC 消息并破坏您的服务器。默认情况下,print() 函数写入标准输出,因此请将其完全排除在 STDIO 服务器之外。
对于基于 HTTP 的服务器: 标准输出日志记录很好,因为它不会干扰 HTTP 响应。
最佳实践
- 使用标准库
logging模块,该模块写入 stderr。 - 使用
logging.getLogger(__name__)为每个模块创建一个记录器,并从您的工具中调用它。
快速示例
import logging

logger = logging.getLogger(__name__)

# ❌ Bad (STDIO)
print("Processing request")

# ✅ Good (STDIO)
logger.info("Processing request")  # writes to stderr
系统要求
- 安装了 Python 3.10 或更高版本。
- 您必须使用 Python MCP SDK 2.0.0 或更高版本。
设置您的环境
首先,让我们安装 uv 并设置我们的 Python 项目和环境:
curl -LsSf https://astral.sh/uv/install.sh | shpowershell -ExecutionPolicy ByPass -c "irm https://astral.sh/uv/install.ps1 | iex"请务必随后重新启动终端,以确保 uv 命令被选中。
现在,让我们创建并设置我们的项目:
# Create a new directory for our project
uv init weather
cd weather

# Create virtual environment and activate it
uv venv
source .venv/bin/activate

# Install dependencies
uv add "mcp[cli]"

# Create our server file
touch weather.py
# Create a new directory for our project
uv init weather
cd weather
# Create virtual environment and activate it
uv venv
.venv\Scripts\activate
# Install dependencies
uv add mcp[cli]
# Create our server file
new-item weather.py现在让我们深入构建您的服务器。
构建您的服务器
导入包并设置实例
将这些添加到 weather.py 的顶部:
from typing import Any

import httpx2
from mcp.server import MCPServer

# Initialize MCPServer
mcp = MCPServer("weather")

# Constants
NWS_API_BASE = "https://api.weather.gov"
USER_AGENT = "weather-app/1.0"httpx2是SDK本身依赖的HTTP客户端,所以安装mcp就已经带进来了。
MCPServer 类使用 Python 类型提示和文档字符串自动生成工具定义,从而可以轻松创建和维护 MCP 工具。
辅助函数
接下来,我们添加辅助函数来查询和格式化来自国家气象服务 API 的数据:
async def make_nws_request(url: str) -> dict[str, Any] | None:
    """Make a request to the NWS API with proper error handling."""
    headers = {"User-Agent": USER_AGENT, "Accept": "application/geo+json"}
    async with httpx2.AsyncClient() as client:
        try:
            response = await client.get(url, headers=headers, timeout=30.0)
            response.raise_for_status()
            return response.json()
        except Exception:
            return None


def format_alert(feature: dict) -> str:
    """Format an alert feature into a readable string."""
    props = feature["properties"]
    return f"""
Event: {props.get("event", "Unknown")}
Area: {props.get("areaDesc", "Unknown")}
Severity: {props.get("severity", "Unknown")}
Description: {props.get("description", "No description available")}
Instructions: {props.get("instruction", "No specific instructions provided")}
"""
实施工具执行
工具执行处理程序负责实际执行每个工具的逻辑。让我们添加它:
@mcp.tool()
async def get_alerts(state: str) -> str:
    """Get weather alerts for a US state.

    Args:
        state: Two-letter US state code (e.g. CA, NY)
    """
    url = f"{NWS_API_BASE}/alerts/active/area/{state}"
    data = await make_nws_request(url)

    if not data or "features" not in data:
        return "Unable to fetch alerts or no alerts found."

    if not data["features"]:
        return "No active alerts for this state."

    alerts = [format_alert(feature) for feature in data["features"]]
    return "\n---\n".join(alerts)


@mcp.tool()
async def get_forecast(latitude: float, longitude: float) -> str:
    """Get weather forecast for a location.

    Args:
        latitude: Latitude of the location
        longitude: Longitude of the location
    """
    # First get the forecast grid endpoint
    points_url = f"{NWS_API_BASE}/points/{latitude},{longitude}"
    points_data = await make_nws_request(points_url)

    if not points_data:
        return "Unable to fetch forecast data for this location."

    # Get the forecast URL from the points response
    forecast_url = points_data["properties"]["forecast"]
    forecast_data = await make_nws_request(forecast_url)

    if not forecast_data:
        return "Unable to fetch detailed forecast."

    # Format the periods into a readable forecast
    periods = forecast_data["properties"]["periods"]
    forecasts = []
    for period in periods[:5]:  # Only show next 5 periods
        forecast = f"""
{period["name"]}:
Temperature: {period["temperature"]}°{period["temperatureUnit"]}
Wind: {period["windSpeed"]} {period["windDirection"]}
Forecast: {period["detailedForecast"]}
"""
        forecasts.append(forecast)

    return "\n---\n".join(forecasts)
运行服务器
最后,让我们初始化并运行服务器:
if __name__ == "__main__":
    mcp.run(transport="stdio")
您的服务器已完成!运行 uv run weather.py 启动 MCP 服务器,该服务器将侦听来自 MCP 主机的消息。
现在让我们从现有的 MCP 主机 Claude for Desktop 测试您的服务器。
可选:使用 Claude for Desktop 集成测试
首先,确保您安装了 Claude for Desktop。 您可以安装最新版本 这里。 如果您已经有 Claude for Desktop,请确保它已更新到最新版本。
我们需要为您要使用的任何 MCP 服务器配置 Claude for Desktop。为此,请在文本编辑器中打开位于 ~/Library/Application Support/Claude/claude_desktop_config.json 的 Claude for Desktop App 配置。如果该文件不存在,请确保创建该文件。
例如,如果您安装了 VS Code:
code ~/.config/Claude/claude_desktop_config.jsoncode ~/Library/Application\ Support/Claude/claude_desktop_config.jsoncode $env:AppData\Claude\claude_desktop_config.json然后,您将在 mcpServers 密钥中添加您的服务器。仅当至少正确配置了一台服务器时,MCP UI 元素才会显示在 Claude for Desktop 中。
在本例中,我们将添加单一天气服务器,如下所示:
{
  "mcpServers": {
    "weather": {
      "command": "uv",
      "args": [
        "--directory",
        "/ABSOLUTE/PATH/TO/PARENT/FOLDER/weather",
        "run",
        "weather.py"
      ]
    }
  }
}
{
"mcpServers": {
"weather": {
"command": "uv",
"args": [
"--directory",
"C:\\ABSOLUTE\\PATH\\TO\\PARENT\\FOLDER\\weather",
"run",
"weather.py"
]
}
}
}uv 可执行文件的完整路径放入 command 字段中。您可以通过在 macOS/Linux 上运行 which uv 或在 Windows 上运行 where uv 来获取此信息。pwd 或在 Windows 命令提示符下运行 cd 来获取此信息。在 Windows 上,请记住在 JSON 路径中使用双反斜杠 (\\) 或正斜杠 (/)。这告诉 Claude for Desktop:
- 有一个名为“weather”的 MCP 服务器
- 通过运行
uv --directory /ABSOLUTE/PATH/TO/PARENT/FOLDER/weather run weather.py启动它
保存文件,然后重新启动 Claude for Desktop。
TypeScript
让我们开始构建我们的天气服务器! 您可以在这里找到我们将要构建的完整代码。
必备知识
本快速入门假设您熟悉:
- TypeScript
- Claude 等 LLM
MCP 服务器日志记录
实现 MCP 服务器时,请注意如何处理日志记录:
对于基于 STDIO 的服务器: 切勿使用 console.log(),因为它默认写入标准输出 (stdout)。写入 stdout 会损坏 JSON-RPC 消息并破坏您的服务器。
对于基于 HTTP 的服务器: 标准输出日志记录很好,因为它不会干扰 HTTP 响应。
最佳实践
- 使用
console.error()写入 stderr,或使用写入 stderr 或文件的日志库。
快速示例
// ❌ Bad (STDIO)
console.log("Server started");

// ✅ Good (STDIO)
console.error("Server started"); // stderr is safe
系统要求
对于 TypeScript,请确保安装了最新版本的 Node。
设置您的环境
首先,让我们安装 Node.js 和 npm(如果尚未安装)。您可以从 nodejs.org 下载它们。 验证您的 Node.js 安装:
node --version
npm --version
对于本教程,您需要 Node.js 版本 20 或更高版本。
现在,让我们创建并设置我们的项目:
# Create a new directory for our project
mkdir weather
cd weather

# Initialize a new npm project
npm init -y

# Install dependencies
npm install @modelcontextprotocol/server zod
npm install -D @types/node typescript

# Create our files
mkdir src
touch src/index.ts
# Create a new directory for our project
md weather
cd weather
# Initialize a new npm project
npm init -y
# Install dependencies
npm install @modelcontextprotocol/server zod
npm install -D @types/node typescript
# Create our files
md src
new-item src\index.ts更新您的 package.json 以添加类型:“module”和构建脚本:
{
  "type": "module",
  "bin": {
    "weather": "./build/index.js"
  },
  "scripts": {
    "build": "tsc && chmod 755 build/index.js"
  },
  "files": ["build"]
}
在项目的根目录中创建 tsconfig.json:
{
  "compilerOptions": {
    "target": "ES2022",
    "module": "Node16",
    "moduleResolution": "Node16",
    "types": ["node"],
    "outDir": "./build",
    "rootDir": "./src",
    "strict": true,
    "esModuleInterop": true,
    "skipLibCheck": true,
    "forceConsistentCasingInFileNames": true
  },
  "include": ["src/**/*"],
  "exclude": ["node_modules"]
}
现在让我们深入构建您的服务器。
构建您的服务器
导入包并设置常量
将这些添加到 src/index.ts 的顶部:
import { McpServer } from "@modelcontextprotocol/server";
import { serveStdio } from "@modelcontextprotocol/server/stdio";
import { z } from "zod";

const NWS_API_BASE = "https://api.weather.gov";
const USER_AGENT = "weather-app/1.0";
辅助函数
接下来,我们添加辅助函数来查询和格式化来自国家气象服务 API 的数据:
// Helper function for making NWS API requests
async function makeNWSRequest<T>(url: string): Promise<T | null> {
  const headers = {
    "User-Agent": USER_AGENT,
    Accept: "application/geo+json",
  };

  try {
    const response = await fetch(url, { headers });
    if (!response.ok) {
      throw new Error(`HTTP error! status: ${response.status}`);
    }
    return (await response.json()) as T;
  } catch (error) {
    console.error("Error making NWS request:", error);
    return null;
  }
}

interface AlertFeature {
  properties: {
    event?: string;
    areaDesc?: string;
    severity?: string;
    status?: string;
    headline?: string;
  };
}

// Format alert data
function formatAlert(feature: AlertFeature): string {
  const props = feature.properties;
  return [
    `Event: ${props.event || "Unknown"}`,
    `Area: ${props.areaDesc || "Unknown"}`,
    `Severity: ${props.severity || "Unknown"}`,
    `Status: ${props.status || "Unknown"}`,
    `Headline: ${props.headline || "No headline"}`,
    "---",
  ].join("\n");
}

interface ForecastPeriod {
  name?: string;
  temperature?: number;
  temperatureUnit?: string;
  windSpeed?: string;
  windDirection?: string;
  shortForecast?: string;
}

interface AlertsResponse {
  features: AlertFeature[];
}

interface PointsResponse {
  properties: {
    forecast?: string;
  };
}

interface ForecastResponse {
  properties: {
    periods: ForecastPeriod[];
  };
}
实施工具执行
工具执行处理程序负责实际执行每个工具的逻辑。让我们将其添加到 createServer() 函数中,该函数构建服务器实例并在其上注册这两个工具:
// Build a server instance and register its tools. serveStdio calls this
// whenever it needs an instance, so every call must return a fresh one.
function createServer() {
  const server = new McpServer({
    name: "weather",
    version: "1.0.0",
  });

  server.registerTool(
    "get_alerts",
    {
      description: "Get weather alerts for a state",
      inputSchema: z.object({
        state: z
          .string()
          .length(2)
          .describe("Two-letter state code (e.g. CA, NY)"),
      }),
    },
    async ({ state }) => {
      const stateCode = state.toUpperCase();
      const alertsUrl = `${NWS_API_BASE}/alerts?area=${stateCode}`;
      const alertsData = await makeNWSRequest<AlertsResponse>(alertsUrl);

      if (!alertsData) {
        return {
          content: [
            {
              type: "text",
              text: "Failed to retrieve alerts data",
            },
          ],
        };
      }

      const features = alertsData.features || [];
      if (!features.length) {
        return {
          content: [
            {
              type: "text",
              text: `No active alerts for ${stateCode}`,
            },
          ],
        };
      }

      const formattedAlerts = features.map(formatAlert);
      const alertsText = `Active alerts for ${stateCode}:\n\n${formattedAlerts.join("\n")}`;

      return {
        content: [
          {
            type: "text",
            text: alertsText,
          },
        ],
      };
    },
  );

  server.registerTool(
    "get_forecast",
    {
      description: "Get weather forecast for a location",
      inputSchema: z.object({
        latitude: z
          .number()
          .min(-90)
          .max(90)
          .describe("Latitude of the location"),
        longitude: z
          .number()
          .min(-180)
          .max(180)
          .describe("Longitude of the location"),
      }),
    },
    async ({ latitude, longitude }) => {
      // Get grid point data
      const pointsUrl = `${NWS_API_BASE}/points/${latitude.toFixed(4)},${longitude.toFixed(4)}`;
      const pointsData = await makeNWSRequest<PointsResponse>(pointsUrl);

      if (!pointsData) {
        return {
          content: [
            {
              type: "text",
              text: `Failed to retrieve grid point data for coordinates: ${latitude}, ${longitude}. This location may not be supported by the NWS API (only US locations are supported).`,
            },
          ],
        };
      }

      const forecastUrl = pointsData.properties?.forecast;
      if (!forecastUrl) {
        return {
          content: [
            {
              type: "text",
              text: "Failed to get forecast URL from grid point data",
            },
          ],
        };
      }

      // Get forecast data
      const forecastData = await makeNWSRequest<ForecastResponse>(forecastUrl);
      if (!forecastData) {
        return {
          content: [
            {
              type: "text",
              text: "Failed to retrieve forecast data",
            },
          ],
        };
      }

      const periods = forecastData.properties?.periods || [];
      if (periods.length === 0) {
        return {
          content: [
            {
              type: "text",
              text: "No forecast periods available",
            },
          ],
        };
      }

      // Format forecast periods
      const formattedForecast = periods.map((period: ForecastPeriod) =>
        [
          `${period.name || "Unknown"}:`,
          `Temperature: ${period.temperature || "Unknown"}°${period.temperatureUnit || "F"}`,
          `Wind: ${period.windSpeed || "Unknown"} ${period.windDirection || ""}`,
          `${period.shortForecast || "No forecast available"}`,
          "---",
        ].join("\n"),
      );

      const forecastText = `Forecast for ${latitude}, ${longitude}:\n\n${formattedForecast.join("\n")}`;

      return {
        content: [
          {
            type: "text",
            text: forecastText,
          },
        ],
      };
    },
  );

  return server;
}
运行服务器
最后,通过 stdio 为服务器提供服务:
serveStdio(createServer, {
  onerror: (error) => console.error("Weather MCP Server error:", error),
});
console.error("Weather MCP Server running on stdio");
serveStdio 与每个客户端协商协议修订版,因此同一服务器同时应答 2026-07-28 客户端和仍以 2025 时代 initialize 握手打开的客户端。每当需要实例时,它都会调用 createServer(),包括一次 server/discover 探针,如果客户端回退到 initialize,该探针就会被丢弃,这就是工厂在每次调用时返回新的 McpServer 的原因。用 server.connect(new StdioServerTransport()) 手动连接服务器仍然可以编译,但以这种方式启动的服务器只能为 2025 时代的客户端提供服务。
确保运行 npm run build 来构建您的服务器!这是连接服务器的非常重要的一步。
要检查服务器是否响应 2026-07-28 客户端,请使用 Inspector CLI 在 modern 协议时代 下列出其工具:
npx @modelcontextprotocol/inspector --cli node build/index.js --protocol-era modern --method tools/listInspector 默认为 legacy 时代,仅执行 2025 时代握手,因此使用 --protocol-era legacy 再次运行相同的命令。两次运行均列出 get_alerts 和 get_forecast。
现在让我们从现有的 MCP 主机 Claude for Desktop 测试您的服务器。
可选:使用 Claude for Desktop 集成测试
首先,确保您安装了 Claude for Desktop。 您可以安装最新版本 这里。 如果您已经有 Claude for Desktop,请确保它已更新到最新版本。
我们需要为您要使用的任何 MCP 服务器配置 Claude for Desktop。为此,请在文本编辑器中打开位于 ~/Library/Application Support/Claude/claude_desktop_config.json 的 Claude for Desktop App 配置。如果该文件不存在,请确保创建该文件。
例如,如果您安装了 VS Code:
code ~/.config/Claude/claude_desktop_config.jsoncode ~/Library/Application\ Support/Claude/claude_desktop_config.jsoncode $env:AppData\Claude\claude_desktop_config.json然后,您将在 mcpServers 密钥中添加您的服务器。仅当至少正确配置了一台服务器时,MCP UI 元素才会显示在 Claude for Desktop 中。
在本例中,我们将添加单一天气服务器,如下所示:
{
  "mcpServers": {
    "weather": {
      "command": "node",
      "args": ["/ABSOLUTE/PATH/TO/PARENT/FOLDER/weather/build/index.js"]
    }
  }
}
{
"mcpServers": {
"weather": {
"command": "node",
"args": ["C:\\PATH\\TO\\PARENT\\FOLDER\\weather\\build\\index.js"]
}
}
}这告诉 Claude for Desktop:
- 有一个名为“weather”的 MCP 服务器
- 通过运行
node /ABSOLUTE/PATH/TO/PARENT/FOLDER/weather/build/index.js启动它
保存文件,然后重新启动 Claude for Desktop。
Java
让我们开始构建我们的天气服务器! 您可以在这里找到我们将要构建的完整代码。
有关详细信息,请参阅 MCP Server Boot Starter 参考文档。 有关手动 MCP 服务器实现,请参阅 MCP 服务器 Java SDK 文档。
MCP 服务器日志记录
实现 MCP 服务器时,请注意如何处理日志记录:
对于基于 STDIO 的服务器: 切勿使用 System.out.println() 或 System.out.print(),因为它们会写入标准输出 (stdout)。写入 stdout 会损坏 JSON-RPC 消息并破坏您的服务器。
对于基于 HTTP 的服务器: 标准输出日志记录很好,因为它不会干扰 HTTP 响应。
最佳实践
- 使用写入 stderr 或文件的日志库。
- 确保任何配置的日志库都不会写入标准输出。
系统要求
- 安装了 Java 17 或更高版本。
- Spring Boot 3.3.x 或更高版本
设置您的环境
使用 Spring Initializer 引导项目。
您将需要添加以下依赖项:
<dependencies>
      <dependency>
          <groupId>org.springframework.ai</groupId>
          <artifactId>spring-ai-starter-mcp-server</artifactId>
      </dependency>

      <dependency>
          <groupId>org.springframework</groupId>
          <artifactId>spring-web</artifactId>
      </dependency>
</dependencies>
dependencies {
implementation platform("org.springframework.ai:spring-ai-starter-mcp-server")
implementation platform("org.springframework:spring-web")
}然后通过设置应用程序属性来配置您的应用程序:
spring.main.bannerMode=off
logging.pattern.console=logging:
pattern:
console:
spring:
main:
banner-mode: off服务器配置属性 记录了所有可用的属性。
现在让我们深入构建您的服务器。
构建您的服务器
气象服务
让我们实现一个 WeatherService.java,它使用 REST 客户端从国家气象服务 API 查询数据:
@Service
public class WeatherService {

	private final RestClient restClient;

	public WeatherService() {
		this.restClient = RestClient.builder()
			.baseUrl("https://api.weather.gov")
			.defaultHeader("Accept", "application/geo+json")
			.defaultHeader("User-Agent", "WeatherApiClient/1.0 ([email protected])")
			.build();
	}

  @Tool(description = "Get weather forecast for a specific latitude/longitude")
  public String getWeatherForecastByLocation(
      double latitude,   // Latitude coordinate
      double longitude   // Longitude coordinate
  ) {
      // Returns detailed forecast including:
      // - Temperature and unit
      // - Wind speed and direction
      // - Detailed forecast description
  }

  @Tool(description = "Get weather alerts for a US state")
  public String getAlerts(
      @ToolParam(description = "Two-letter US state code (e.g. CA, NY)") String state
  ) {
      // Returns active alerts including:
      // - Event type
      // - Affected area
      // - Severity
      // - Description
      // - Safety instructions
  }

  // ......
}
@Service 注释将在您的应用程序上下文中自动注册服务。
Spring AI @Tool注释可以轻松创建和维护MCP工具。
自动配置将自动向 MCP 服务器注册这些工具。
创建您的启动应用程序
@SpringBootApplication
public class McpServerApplication {

	public static void main(String[] args) {
		SpringApplication.run(McpServerApplication.class, args);
	}

	@Bean
	public ToolCallbackProvider weatherTools(WeatherService weatherService) {
		return  MethodToolCallbackProvider.builder().toolObjects(weatherService).build();
	}
}
使用 MethodToolCallbackProvider 实用程序将 @Tools 转换为 MCP 服务器使用的可操作回调。
运行服务器
最后,让我们构建服务器:
./mvnw clean install这将在 target 文件夹中生成 mcp-weather-stdio-server-0.0.1-SNAPSHOT.jar 文件。
现在让我们从现有的 MCP 主机 Claude for Desktop 测试您的服务器。
可选:使用 Claude for Desktop 集成测试
首先,确保您安装了 Claude for Desktop。 您可以在此处安装最新版本。 如果您已经有 Claude for Desktop,请确保它已更新到最新版本。
我们需要为您要使用的任何 MCP 服务器配置 Claude for Desktop。
为此,请在文本编辑器中打开位于 ~/Library/Application Support/Claude/claude_desktop_config.json 的 Claude for Desktop App 配置。
如果该文件不存在,请确保创建该文件。
例如,如果您安装了 VS Code:
code ~/.config/Claude/claude_desktop_config.jsoncode ~/Library/Application\ Support/Claude/claude_desktop_config.jsoncode $env:AppData\Claude\claude_desktop_config.json然后,您将在 mcpServers 密钥中添加您的服务器。
仅当至少正确配置了一台服务器时,MCP UI 元素才会显示在 Claude for Desktop 中。
在本例中,我们将添加单一天气服务器,如下所示:
{
  "mcpServers": {
    "spring-ai-mcp-weather": {
      "command": "java",
      "args": [
        "-Dspring.ai.mcp.server.stdio=true",
        "-jar",
        "/ABSOLUTE/PATH/TO/PARENT/FOLDER/mcp-weather-stdio-server-0.0.1-SNAPSHOT.jar"
      ]
    }
  }
}
{
"mcpServers": {
"spring-ai-mcp-weather": {
"command": "java",
"args": [
"-Dspring.ai.mcp.server.transport=STDIO",
"-jar",
"C:\\ABSOLUTE\\PATH\\TO\\PARENT\\FOLDER\\weather\\mcp-weather-stdio-server-0.0.1-SNAPSHOT.jar"
]
}
}
}这告诉 Claude for Desktop:
- 有一个名为“my-weather-server”的 MCP 服务器
- 通过运行
java -jar /ABSOLUTE/PATH/TO/PARENT/FOLDER/mcp-weather-stdio-server-0.0.1-SNAPSHOT.jar启动它
保存文件,然后重新启动 Claude for Desktop。
使用 Java 客户端测试您的服务器
手动创建 MCP 客户端
使用McpClient连接服务器:
var stdioParams = ServerParameters.builder("java")
  .args("-jar", "/ABSOLUTE/PATH/TO/PARENT/FOLDER/mcp-weather-stdio-server-0.0.1-SNAPSHOT.jar")
  .build();

var stdioTransport = new StdioClientTransport(stdioParams, McpJsonDefaults.getMapper());

var mcpClient = McpClient.sync(stdioTransport).build();

mcpClient.initialize();

ListToolsResult toolsList = mcpClient.listTools();

CallToolResult weather = mcpClient.callTool(
  new CallToolRequest("getWeatherForecastByLocation",
      Map.of("latitude", "47.6062", "longitude", "-122.3321")));

CallToolResult alert = mcpClient.callTool(
  new CallToolRequest("getAlerts", Map.of("state", "NY")));

mcpClient.closeGracefully();
使用 MCP Client Boot Starter
使用 spring-ai-starter-mcp-client 依赖项创建新的启动启动应用程序:
<dependency>
    <groupId>org.springframework.ai</groupId>
    <artifactId>spring-ai-starter-mcp-client</artifactId>
</dependency>
并将 spring.ai.mcp.client.stdio.servers-configuration 属性设置为指向您的 claude_desktop_config.json。
您可以重复使用现有的 Anthropic Desktop 配置:
spring.ai.mcp.client.stdio.servers-configuration=file:PATH/TO/claude_desktop_config.json当您启动客户端应用程序时,自动配置将自动从 claude_desktop_config.json 创建 MCP 客户端。
有关更多信息,请参阅 MCP Client Boot Starters 参考文档。
更多 Java MCP 服务器示例
starter-webflux-server 演示了如何使用 WebFlux 启动器创建基于 HTTP 的 MCP 服务器。
设置 spring.ai.mcp.server.protocol=STREAMABLE 属性以通过 Streamable HTTP 提供服务。
它展示了如何使用 Spring Boot 的自动配置功能来定义和注册 MCP 工具、资源和提示。
Kotlin
让我们开始构建我们的天气服务器! 您可以在这里找到我们将要构建的完整代码。
必备知识
本快速入门假设您熟悉:
- Kotlin
- Claude 等 LLM
MCP 服务器日志记录
实现 MCP 服务器时,请注意如何处理日志记录:
对于基于 STDIO 的服务器: 切勿使用 println(),因为它默认写入标准输出 (stdout)。写入 stdout 会损坏 JSON-RPC 消息并破坏您的服务器。
对于基于 HTTP 的服务器: 标准输出日志记录很好,因为它不会干扰 HTTP 响应。
最佳实践
- 使用写入 stderr 或文件的日志库。
系统要求
- 安装了 JDK 11 或更高版本。
设置您的环境
首先,如果您还没有安装 java 和 gradle,请先安装。
您可以从 Oracle JDK 官方网站 下载 java。
验证您的 java 安装:
java --version现在,让我们创建并设置您的项目:
# Create a new directory for our project
mkdir weather
cd weather

# Initialize a new kotlin project
gradle init
# Create a new directory for our project
md weather
cd weather
# Initialize a new kotlin project
gradle init运行gradle init后,选择Application作为项目类型,Kotlin作为编程语言。
或者,您可以使用 IntelliJ IDEA 项目向导 创建 Kotlin 应用程序。
创建项目后,将 build.gradle.kts 的内容替换为:
// Check latest versions at https://github.com/modelcontextprotocol/kotlin-sdk/releases
val mcpVersion = "0.16.0"
val ktorVersion = "3.2.3"
val slf4jVersion = "2.0.17"

plugins {
    kotlin("jvm") version "2.3.20"
    kotlin("plugin.serialization") version "2.3.20"
    id("com.gradleup.shadow") version "8.3.9"
    application
}

repositories {
    mavenCentral()
}

application {
    mainClass.set("MainKt")
}

dependencies {
    implementation("io.modelcontextprotocol:kotlin-sdk:$mcpVersion")
    implementation("io.ktor:ktor-client-content-negotiation:$ktorVersion")
    implementation("io.ktor:ktor-serialization-kotlinx-json:$ktorVersion")
    implementation("io.ktor:ktor-client-cio:$ktorVersion")
    implementation("org.slf4j:slf4j-simple:$slf4jVersion")
}
验证一切设置是否正确:
./gradlew build现在让我们深入构建您的服务器。
构建您的服务器
设置实例
添加服务器初始化函数:
fun runMcpServer() {
    val server = Server(
        Implementation(
            name = "weather",
            version = "1.0.0",
        ),
        ServerOptions(
            capabilities = ServerCapabilities(tools = ServerCapabilities.Tools(listChanged = true)),
        ),
    )

    // register tools on server here

    val transport = StdioServerTransport(
        System.`in`.asInput(),
        System.out.asSink().buffered(),
    )

    runBlocking {
        val session = server.createSession(transport)
        val done = Job()
        session.onClose {
            done.complete()
        }
        done.join()
    }
}
天气 API 辅助函数
接下来,我们添加函数和数据类,用于查询和转换来自国家气象服务 API 的响应:
val httpClient = HttpClient(CIO) {
    defaultRequest {
        url("https://api.weather.gov")
        headers {
            append("Accept", "application/geo+json")
            append("User-Agent", "WeatherApiClient/1.0")
        }
        contentType(ContentType.Application.Json)
    }
    install(ContentNegotiation) {
        json(Json { ignoreUnknownKeys = true })
    }
}

// Extension function to fetch weather alerts for a given state
suspend fun HttpClient.getAlerts(state: String): List<String> {
    val alerts = this.get("/alerts/active/area/$state").body<AlertsResponse>()
    return alerts.features.map { feature ->
        """
            Event: ${feature.properties.event}
            Area: ${feature.properties.areaDesc}
            Severity: ${feature.properties.severity}
            Status: ${feature.properties.status}
            Headline: ${feature.properties.headline}
        """.trimIndent()
    }
}

// Extension function to fetch forecast information for given latitude and longitude
suspend fun HttpClient.getForecast(latitude: Double, longitude: Double): List<String> {
    val points = this.get("/points/$latitude,$longitude").body<PointsResponse>()
    val forecastUrl = points.properties.forecast ?: error("No forecast URL available")
    val forecast = this.get(forecastUrl).body<ForecastResponse>()
    return forecast.properties.periods.map { period ->
        """
            ${period.name}:
            Temperature: ${period.temperature}°${period.temperatureUnit}
            Wind: ${period.windSpeed} ${period.windDirection}
            ${period.shortForecast}
        """.trimIndent()
    }
}

@Serializable
data class PointsResponse(val properties: PointsProperties)

@Serializable
data class PointsProperties(val forecast: String? = null)

@Serializable
data class ForecastResponse(val properties: ForecastProperties)

@Serializable
data class ForecastProperties(val periods: List<ForecastPeriod> = emptyList())

@Serializable
data class ForecastPeriod(
    val name: String? = null,
    val temperature: Int? = null,
    val temperatureUnit: String? = null,
    val windSpeed: String? = null,
    val windDirection: String? = null,
    val shortForecast: String? = null,
)

@Serializable
data class AlertsResponse(val features: List<AlertFeature> = emptyList())

@Serializable
data class AlertFeature(val properties: AlertProperties)

@Serializable
data class AlertProperties(
    val event: String? = null,
    val areaDesc: String? = null,
    val severity: String? = null,
    val status: String? = null,
    val headline: String? = null,
)
实施工具执行
工具执行处理程序负责实际执行每个工具的逻辑。让我们添加它:
// Register weather tools

server.addTool(
    name = "get_alerts",
    description = "Get weather alerts for a US state. Input is a two-letter US state code (e.g. CA, NY)",
    inputSchema = ToolSchema(
        properties = buildJsonObject {
            putJsonObject("state") {
                put("type", "string")
                put("description", "Two-letter US state code (e.g. CA, NY)")
            }
        },
        required = listOf("state"),
    ),
) { request ->
    val state = request.arguments?.get("state")?.jsonPrimitive?.content
        ?: return@addTool CallToolResult(
            content = listOf(TextContent("The 'state' parameter is required.")),
        )

    val alerts = httpClient.getAlerts(state)
    CallToolResult(content = alerts.map { TextContent(it) })
}

server.addTool(
    name = "get_forecast",
    description = "Get weather forecast for a location. Note: only US locations are supported by the NWS API.",
    inputSchema = ToolSchema(
        properties = buildJsonObject {
            putJsonObject("latitude") {
                put("type", "number")
                put("description", "Latitude of the location")
            }
            putJsonObject("longitude") {
                put("type", "number")
                put("description", "Longitude of the location")
            }
        },
        required = listOf("latitude", "longitude"),
    ),
) { request ->
    val latitude = request.arguments?.get("latitude")?.jsonPrimitive?.doubleOrNull
    val longitude = request.arguments?.get("longitude")?.jsonPrimitive?.doubleOrNull
    if (latitude == null || longitude == null) {
        return@addTool CallToolResult(
            content = listOf(TextContent("The 'latitude' and 'longitude' parameters are required.")),
        )
    }

    val forecast = httpClient.getForecast(latitude, longitude)
    CallToolResult(content = forecast.map { TextContent(it) })
}
运行服务器
最后,实现运行服务器的main函数:
fun main() = runMcpServer()您可以在开发过程中直接运行服务器:
./gradlew run对于生产用途,构建影子 JAR:
./gradlew build
java -jar build/libs/weather-all.jar
现在让我们从现有的 MCP 主机 Claude for Desktop 测试您的服务器。
可选:使用 Claude for Desktop 集成测试
首先,确保您安装了 Claude for Desktop。 您可以安装最新版本 这里。 如果您已经有 Claude for Desktop,请确保它已更新到最新版本。
我们需要为您要使用的任何 MCP 服务器配置 Claude for Desktop。
为此,请在文本编辑器中打开位于 ~/Library/Application Support/Claude/claude_desktop_config.json 的 Claude for Desktop App 配置。
如果该文件不存在,请确保创建该文件。
例如,如果您安装了 VS Code:
code ~/.config/Claude/claude_desktop_config.jsoncode ~/Library/Application\ Support/Claude/claude_desktop_config.jsoncode $env:AppData\Claude\claude_desktop_config.json然后,您将在 mcpServers 密钥中添加您的服务器。
仅当至少正确配置了一台服务器时,MCP UI 元素才会显示在 Claude for Desktop 中。
在本例中,我们将添加单一天气服务器,如下所示:
{
  "mcpServers": {
    "weather": {
      "command": "java",
      "args": [
        "-jar",
        "/ABSOLUTE/PATH/TO/PARENT/FOLDER/weather/build/libs/weather-all.jar"
      ]
    }
  }
}
{
"mcpServers": {
"weather": {
"command": "java",
"args": [
"-jar",
"C:\\PATH\\TO\\PARENT\\FOLDER\\weather\\build\\libs\\weather-all.jar"
]
}
}
}这告诉 Claude for Desktop:
- 有一个名为“weather”的 MCP 服务器
- 通过运行
java -jar /ABSOLUTE/PATH/TO/PARENT/FOLDER/weather/build/libs/weather-all.jar启动它
保存文件,然后重新启动 Claude for Desktop。
C#
让我们开始构建我们的天气服务器! 您可以在这里找到我们将要构建的完整代码。
必备知识
本快速入门假设您熟悉:
- C#
- Claude 等 LLM
- .NET 8 或更高版本
MCP 服务器日志记录
实现 MCP 服务器时,请注意如何处理日志记录:
对于基于 STDIO 的服务器: 切勿使用 Console.WriteLine() 或 Console.Write(),因为它们会写入标准输出 (stdout)。写入 stdout 会损坏 JSON-RPC 消息并破坏您的服务器。
对于基于 HTTP 的服务器: 标准输出日志记录很好,因为它不会干扰 HTTP 响应。
最佳实践
- 使用写入 stderr 或文件的日志库。
系统要求
- 已安装.NET 8 SDK 或更高版本。
设置您的环境
首先,如果您还没有安装 dotnet,请先安装。您可以从 Microsoft .NET 官方网站 下载 dotnet。验证您的 dotnet 安装:
dotnet --version现在,让我们创建并设置您的项目:
# Create a new directory for our project
mkdir weather
cd weather
# Initialize a new C# project
dotnet new console
# Create a new directory for our project
mkdir weather
cd weather
# Initialize a new C# project
dotnet new console运行 dotnet new console 后,您将看到一个新的 C# 项目。
您可以在您喜欢的 IDE 中打开该项目,例如 Visual Studio 或 Rider。
或者,您可以使用 Visual Studio 项目向导 创建 C# 应用程序。
创建项目后,为 MCP SDK 和托管添加 NuGet 包:
# Add the Model Context Protocol SDK NuGet package
dotnet add package ModelContextProtocol --prerelease
# Add the .NET Hosting NuGet package
dotnet add package Microsoft.Extensions.Hosting
现在让我们深入构建您的服务器。
构建您的服务器
打开项目中的 Program.cs 文件并将其内容替换为以下代码:
using Microsoft.Extensions.DependencyInjection;
using Microsoft.Extensions.Hosting;
using ModelContextProtocol;
using System.Net.Http.Headers;

var builder = Host.CreateEmptyApplicationBuilder(settings: null);

builder.Services.AddMcpServer()
    .WithStdioServerTransport()
    .WithToolsFromAssembly();

builder.Services.AddSingleton(_ =>
{
    var client = new HttpClient() { BaseAddress = new Uri("https://api.weather.gov") };
    client.DefaultRequestHeaders.UserAgent.Add(new ProductInfoHeaderValue("weather-tool", "1.0"));
    return client;
});

var app = builder.Build();

await app.RunAsync();ApplicationHostBuilder 时,请确保使用 CreateEmptyApplicationBuilder 而不是 CreateDefaultBuilder。这可确保服务器不会向控制台写入任何其他消息。这仅对于使用 STDIO 传输的服务器是必需的。此代码设置一个基本控制台应用程序,该应用程序使用 MCP SDK 创建具有标准 I/O 传输的 MCP 服务器。
天气 API 辅助函数
为 HttpClient 创建一个扩展类,这有助于简化 JSON 请求处理:
using System.Text.Json;

internal static class HttpClientExt
{
    public static async Task<JsonDocument> ReadJsonDocumentAsync(this HttpClient client, string requestUri)
    {
        using var response = await client.GetAsync(requestUri);
        response.EnsureSuccessStatusCode();
        return await JsonDocument.ParseAsync(await response.Content.ReadAsStreamAsync());
    }
}
接下来,定义一个带有工具执行处理程序的类,用于查询和转换来自国家气象服务 API 的响应:
using ModelContextProtocol.Server;
using System.ComponentModel;
using System.Globalization;
using System.Text.Json;

namespace QuickstartWeatherServer.Tools;

[McpServerToolType]
public static class WeatherTools
{
    [McpServerTool, Description("Get weather alerts for a US state code.")]
    public static async Task<string> GetAlerts(
        HttpClient client,
        [Description("The US state code to get alerts for.")] string state)
    {
        using var jsonDocument = await client.ReadJsonDocumentAsync($"/alerts/active/area/{state}");
        var jsonElement = jsonDocument.RootElement;
        var alerts = jsonElement.GetProperty("features").EnumerateArray();

        if (!alerts.Any())
        {
            return "No active alerts for this state.";
        }

        return string.Join("\n--\n", alerts.Select(alert =>
        {
            JsonElement properties = alert.GetProperty("properties");
            return $"""
                    Event: {properties.GetProperty("event").GetString()}
                    Area: {properties.GetProperty("areaDesc").GetString()}
                    Severity: {properties.GetProperty("severity").GetString()}
                    Description: {properties.GetProperty("description").GetString()}
                    Instruction: {properties.GetProperty("instruction").GetString()}
                    """;
        }));
    }

    [McpServerTool, Description("Get weather forecast for a location.")]
    public static async Task<string> GetForecast(
        HttpClient client,
        [Description("Latitude of the location.")] double latitude,
        [Description("Longitude of the location.")] double longitude)
    {
        var pointUrl = string.Create(CultureInfo.InvariantCulture, $"/points/{latitude},{longitude}");
        using var jsonDocument = await client.ReadJsonDocumentAsync(pointUrl);
        var forecastUrl = jsonDocument.RootElement.GetProperty("properties").GetProperty("forecast").GetString()
            ?? throw new Exception($"No forecast URL provided by {client.BaseAddress}points/{latitude},{longitude}");

        using var forecastDocument = await client.ReadJsonDocumentAsync(forecastUrl);
        var periods = forecastDocument.RootElement.GetProperty("properties").GetProperty("periods").EnumerateArray();

        return string.Join("\n---\n", periods.Select(period => $"""
                {period.GetProperty("name").GetString()}
                Temperature: {period.GetProperty("temperature").GetInt32()}°F
                Wind: {period.GetProperty("windSpeed").GetString()} {period.GetProperty("windDirection").GetString()}
                Forecast: {period.GetProperty("detailedForecast").GetString()}
                """));
    }
}
运行服务器
最后,使用以下命令运行服务器:
dotnet run这将启动服务器并侦听标准输入/输出上的传入请求。
可选:使用 Claude for Desktop 集成测试
首先,确保您安装了 Claude for Desktop。 您可以安装最新版本
这里。 如果您已经有 Claude for Desktop,请确保它已更新到最新版本。
我们需要为您要使用的任何 MCP 服务器配置 Claude for Desktop。为此,请在文本编辑器中打开位于 ~/Library/Application Support/Claude/claude_desktop_config.json 的 Claude for Desktop App 配置。如果该文件不存在,请确保创建该文件。
例如,如果您安装了 VS Code:
code ~/.config/Claude/claude_desktop_config.jsoncode ~/Library/Application\ Support/Claude/claude_desktop_config.jsoncode $env:AppData\Claude\claude_desktop_config.json然后,您将在 mcpServers 密钥中添加您的服务器。仅当至少正确配置了一台服务器时,MCP UI 元素才会显示在 Claude for Desktop 中。
在本例中,我们将添加单一天气服务器,如下所示:
{
  "mcpServers": {
    "weather": {
      "command": "dotnet",
      "args": ["run", "--project", "/ABSOLUTE/PATH/TO/PROJECT", "--no-build"]
    }
  }
}
{
"mcpServers": {
"weather": {
"command": "dotnet",
"args": [
"run",
"--project",
"C:\\ABSOLUTE\\PATH\\TO\\PROJECT",
"--no-build"
]
}
}
}这告诉 Claude for Desktop:
- 有一个名为“weather”的 MCP 服务器
- 通过运行
dotnet run /ABSOLUTE/PATH/TO/PROJECT启动它 保存文件,然后重新启动 Claude for Desktop。
Ruby
让我们开始构建我们的天气服务器! 您可以在这里找到我们将要构建的完整代码。
必备知识
本快速入门假设您熟悉:
- Ruby
- Claude 等 LLM
MCP 服务器日志记录
实现 MCP 服务器时,请注意如何处理日志记录:
对于基于 STDIO 的服务器: 切勿使用 puts 或 print,因为它们默认写入标准输出 (stdout)。写入 stdout 会损坏 JSON-RPC 消息并破坏您的服务器。
对于基于 HTTP 的服务器: 标准输出日志记录很好,因为它不会干扰 HTTP 响应。
最佳实践
- 使用写入 stderr 或文件的日志库。
快速示例
# ❌ Bad (STDIO)
puts "Processing request"

# ✅ Good (STDIO)
require "logger"
logger = Logger.new($stderr)
logger.info("Processing request")
系统要求
- 安装了 Ruby 2.7 或更高版本。
设置您的环境
首先,让我们确保您已经安装了 Ruby。您可以通过运行来检查:
ruby --version现在,让我们创建并设置我们的项目:
# Create a new directory for our project
mkdir weather
cd weather

# Create a Gemfile
bundle init

# Add the MCP SDK dependency
bundle add mcp

# Create our server file
touch weather.rb
# Create a new directory for our project
mkdir weather
cd weather
# Create a Gemfile
bundle init
# Add the MCP SDK dependency
bundle add mcp
# Create our server file
new-item weather.rb现在让我们深入构建您的服务器。
构建您的服务器
导入包并设置常量
打开 weather.rb 并在顶部添加这些要求和常量:
require "json"
require "mcp"
require "net/http"
require "uri"

NWS_API_BASE = "https://api.weather.gov"
USER_AGENT = "weather-app/1.0"
mcp gem 为 Ruby 提供了 MCP SDK,其中包含用于服务器实现和 stdio 传输的类。
辅助方法
接下来,我们添加用于从国家气象服务 API 查询和格式化数据的辅助方法:
module HelperMethods
  def make_nws_request(url)
    uri = URI(url)
    request = Net::HTTP::Get.new(uri)
    request["User-Agent"] = USER_AGENT
    request["Accept"] = "application/geo+json"

    response = Net::HTTP.start(uri.hostname, uri.port, use_ssl: true) do |http|
      http.request(request)
    end

    raise "HTTP #{response.code}: #{response.message}" unless response.is_a?(Net::HTTPSuccess)

    JSON.parse(response.body)
  end

  def format_alert(feature)
    properties = feature["properties"]

    <<~ALERT
      Event: #{properties["event"] || "Unknown"}
      Area: #{properties["areaDesc"] || "Unknown"}
      Severity: #{properties["severity"] || "Unknown"}
      Description: #{properties["description"] || "No description available"}
      Instructions: #{properties["instruction"] || "No specific instructions provided"}
    ALERT
  end
end
实施工具执行
现在让我们定义我们的工具类。每个工具都是 MCP::Tool 的子类并实现工具逻辑:
class GetAlerts < MCP::Tool
  extend HelperMethods

  tool_name "get_alerts"
  description "Get weather alerts for a US state"
  input_schema(
    properties: {
      state: {
        type: "string",
        description: "Two-letter US state code (e.g. CA, NY)"
      }
    },
    required: ["state"]
  )

  def self.call(state:)
    url = "#{NWS_API_BASE}/alerts/active/area/#{state.upcase}"
    data = make_nws_request(url)

    if data["features"].empty?
      return MCP::Tool::Response.new([{
        type: "text",
        text: "No active alerts for this state."
      }])
    end

    alerts = data["features"].map { |feature| format_alert(feature) }
    MCP::Tool::Response.new([{
      type: "text",
      text: alerts.join("\n---\n")
    }])
  end
end

class GetForecast < MCP::Tool
  extend HelperMethods

  tool_name "get_forecast"
  description "Get weather forecast for a location"
  input_schema(
    properties: {
      latitude: {
        type: "number",
        description: "Latitude of the location"
      },
      longitude: {
        type: "number",
        description: "Longitude of the location"
      }
    },
    required: ["latitude", "longitude"]
  )

  def self.call(latitude:, longitude:)
    # First get the forecast grid endpoint.
    points_url = "#{NWS_API_BASE}/points/#{latitude},#{longitude}"
    points_data = make_nws_request(points_url)

    # Get the forecast URL from the points response.
    forecast_url = points_data["properties"]["forecast"]
    forecast_data = make_nws_request(forecast_url)

    # Format the periods into a readable forecast.
    periods = forecast_data["properties"]["periods"]
    forecasts = periods.first(5).map do |period|
      <<~FORECAST
        #{period["name"]}:
        Temperature: #{period["temperature"]}°#{period["temperatureUnit"]}
        Wind: #{period["windSpeed"]} #{period["windDirection"]}
        Forecast: #{period["detailedForecast"]}
      FORECAST
    end

    MCP::Tool::Response.new([{
      type: "text",
      text: forecasts.join("\n---\n")
    }])
  end
end
运行服务器
最后,初始化并运行服务器:
server = MCP::Server.new(
  name: "weather",
  version: "1.0.0",
  tools: [GetAlerts, GetForecast]
)

transport = MCP::Server::Transports::StdioTransport.new(server)
transport.open
您的服务器已完成!运行 bundle exec ruby weather.rb 启动 MCP 服务器,该服务器将侦听来自 MCP 主机的消息。
现在让我们从现有的 MCP 主机 Claude for Desktop 测试您的服务器。
可选:使用 Claude for Desktop 集成测试
首先,确保您安装了 Claude for Desktop。 您可以在此处安装最新版本。 如果您已经有 Claude for Desktop,请确保它已更新到最新版本。
我们需要为您要使用的任何 MCP 服务器配置 Claude for Desktop。为此,请在文本编辑器中打开位于 ~/Library/Application Support/Claude/claude_desktop_config.json 的 Claude for Desktop App 配置。如果该文件不存在,请确保创建该文件。
例如,如果您安装了 VS Code:
code ~/.config/Claude/claude_desktop_config.jsoncode ~/Library/Application\ Support/Claude/claude_desktop_config.jsoncode $env:AppData\Claude\claude_desktop_config.json然后,您将在 mcpServers 密钥中添加您的服务器。仅当至少正确配置了一台服务器时,MCP UI 元素才会显示在 Claude for Desktop 中。
在本例中,我们将添加单一天气服务器,如下所示:
{
  "mcpServers": {
    "weather": {
      "command": "bundle",
      "args": ["exec", "ruby", "weather.rb"],
      "cwd": "/ABSOLUTE/PATH/TO/PARENT/FOLDER/weather"
    }
  }
}
{
"mcpServers": {
"weather": {
"command": "bundle",
"args": ["exec", "ruby", "weather.rb"],
"cwd": "C:\\ABSOLUTE\\PATH\\TO\\PARENT\\FOLDER\\weather"
}
}
}cwd 字段中传递项目目录的绝对路径。您可以通过从项目目录运行 macOS/Linux 上的 pwd 或 Windows 命令提示符上的 cd 来获取此信息。在 Windows 上,请记住在 JSON 路径中使用双反斜杠 (\\) 或正斜杠 (/)。这告诉 Claude for Desktop:
- 有一个名为“weather”的 MCP 服务器
- 通过在指定目录中运行
bundle exec ruby weather.rb来启动它
保存文件,然后重新启动 Claude for Desktop。
Rust
让我们开始构建我们的天气服务器! 您可以在这里找到我们将要构建的完整代码。
必备知识
本快速入门假设您熟悉:
- Rust 编程语言
- Rust 中的异步/等待
- Claude 等 LLM
MCP 服务器日志记录
实现 MCP 服务器时,请注意如何处理日志记录:
对于基于 STDIO 的服务器: 切勿使用 println!() 或 print!(),因为它们会写入标准输出 (stdout)。写入 stdout 会损坏 JSON-RPC 消息并破坏您的服务器。
对于基于 HTTP 的服务器: 标准输出日志记录很好,因为它不会干扰 HTTP 响应。
最佳实践
- 使用写入 stderr 或文件的日志库,例如 Rust 中的
tracing或log。 - 配置您的日志框架以避免标准输出输出。
快速示例
// ❌ Bad (STDIO)
println!("Processing request");

// ✅ Good (STDIO)
eprintln!("Processing request"); // writes to stderr
系统要求
- 安装 Rust 1.88 或更高版本。这是
rmcpcrate 声明的最低版本。 - Cargo(带有 Rust 安装)。
设置您的环境
首先,如果你还没有安装 Rust,我们来安装一下。你可以从 rust-lang.org 安装 Rust:
curl --proto '=https' --tlsv1.2 -sSf https://sh.rustup.rs | sh# Download and run rustup-init.exe from https://rustup.rs/验证您的 Rust 安装:
rustc --version
cargo --version
现在,让我们创建并设置我们的项目:
# Create a new Rust project
cargo new weather
cd weather
# Create a new Rust project
cargo new weather
cd weather更新您的 Cargo.toml 以添加所需的依赖项:
[package]
name = "weather"
version = "0.1.0"
edition = "2024"

[dependencies]
rmcp = { version = "3.4", features = ["server", "macros", "transport-io"] }
tokio = { version = "1.53", features = ["full"] }
reqwest = { version = "0.13", features = ["json"] }
serde = { version = "1.0", features = ["derive"] }
serde_json = "1.0"
anyhow = "1.0"
现在让我们深入构建您的服务器。
构建您的服务器
导入包和常量
打开 src/main.rs 并在顶部添加这些导入和常量:
use anyhow::Result;
use rmcp::{
    ErrorData, ServerHandler, ServiceExt,
    handler::server::{router::tool::ToolRouter, tool::schema_for_output, wrapper::Parameters},
    model::*,
    schemars::{self, JsonSchema},
    tool, tool_handler, tool_router,
    transport::stdio,
};
use serde::Deserialize;
use serde::de::DeserializeOwned;
use serde::Serialize;

const NWS_API_BASE: &str = "https://api.weather.gov";
const USER_AGENT: &str = "weather-app/1.0";
rmcp crate 提供了 Rust MCP SDK,支持服务器实现、过程宏和 stdio 传输。Parameters 解包客户端发给工具的参数,schema_for_output 构建工具为返回结果公布的 JSON Schema,stdio 是标准输入输出传输。
数据结构
接下来,我们定义用于反序列化来自国家气象服务 API 的响应的数据结构:
#[derive(Debug, Deserialize)]
struct AlertsResponse {
    features: Vec<AlertFeature>,
}

#[derive(Debug, Deserialize)]
struct AlertFeature {
    properties: AlertProperties,
}

#[derive(Debug, Deserialize)]
struct AlertProperties {
    event: Option<String>,
    #[serde(rename = "areaDesc")]
    area_desc: Option<String>,
    severity: Option<String>,
    description: Option<String>,
    instruction: Option<String>,
}

#[derive(Debug, Deserialize)]
struct PointsResponse {
    properties: PointsProperties,
}

#[derive(Debug, Deserialize)]
struct PointsProperties {
    forecast: String,
}

#[derive(Debug, Deserialize)]
struct ForecastResponse {
    properties: ForecastProperties,
}

#[derive(Debug, Deserialize)]
struct ForecastProperties {
    periods: Vec<ForecastPeriod>,
}

#[derive(Debug, Deserialize)]
struct ForecastPeriod {
    name: String,
    temperature: i32,
    #[serde(rename = "temperatureUnit")]
    temperature_unit: String,
    #[serde(rename = "windSpeed")]
    wind_speed: String,
    #[serde(rename = "windDirection")]
    wind_direction: String,
    #[serde(rename = "detailedForecast")]
    detailed_forecast: String,
}
每个工具在文本之外还会返回结构化内容。定义描述它的类型。派生 JsonSchema 让服务器把这些类型的形状公布为工具的输出 schema,文档注释会成为该 schema 里的属性描述:
/// One element of `get_alerts`' structured content. Declaring `Vec<Alert>` as
/// the output schema makes `structuredContent` a top-level JSON array rather
/// than an object wrapping one, which revision 2026-07-28 is the first to allow.
#[derive(Debug, Serialize, JsonSchema)]
pub struct Alert {
    /// The kind of weather event.
    event: String,
    /// The area the alert covers.
    area: String,
    /// How severe the event is.
    severity: String,
    /// What is happening.
    description: String,
    /// What people in the area should do.
    instructions: String,
}

/// `get_forecast`' structured content: the object case.
#[derive(Debug, Serialize, JsonSchema)]
pub struct Forecast {
    /// Latitude the forecast is for.
    latitude: f32,
    /// Longitude the forecast is for.
    longitude: f32,
    /// The forecast periods, soonest first.
    periods: Vec<Period>,
}

#[derive(Debug, Serialize, JsonSchema)]
pub struct Period {
    name: String,
    temperature: i32,
    temperature_unit: String,
    wind_speed: String,
    wind_direction: String,
    detailed_forecast: String,
}
辅助函数
添加用于发出 API 请求、格式化文本,以及构建同时携带文本和结构化内容的工具结果的辅助函数:
async fn make_nws_request<T: DeserializeOwned>(url: &str) -> Result<T> {
    let client = reqwest::Client::new();
    let rsp = client
        .get(url)
        .header(reqwest::header::USER_AGENT, USER_AGENT)
        .header(reqwest::header::ACCEPT, "application/geo+json")
        .send()
        .await?
        .error_for_status()?;
    Ok(rsp.json::<T>().await?)
}

fn format_alert(alert: &Alert) -> String {
    format!(
        "Event: {}\nArea: {}\nSeverity: {}\nDescription: {}\nInstructions: {}",
        alert.event, alert.area, alert.severity, alert.description, alert.instructions
    )
}

fn format_period(period: &Period) -> String {
    format!(
        "{}:\nTemperature: {}°{}\nWind: {} {}\nForecast: {}",
        period.name,
        period.temperature,
        period.temperature_unit,
        period.wind_speed,
        period.wind_direction,
        period.detailed_forecast
    )
}

/// Build a result carrying both channels.
fn dual_channel_result(
    text: String,
    structured: impl Serialize,
) -> Result<CallToolResult, ErrorData> {
    let value = serde_json::to_value(structured).map_err(|e| {
        ErrorData::internal_error(format!("failed to serialize structured content: {e}"), None)
    })?;
    let mut result = CallToolResult::success(vec![ContentBlock::text(text)]);
    result.structured_content = Some(value);
    Ok(result)
}
dual_channel_result 构建一个 CallToolResult:content 装人类可读的文本,structured_content 装与工具输出 schema 匹配的 JSON。
实施天气服务器和工具
现在定义 MCP 客户端将发送的请求类型:
#[derive(serde::Deserialize, JsonSchema)]
pub struct MCPForecastRequest {
    /// Latitude of the location.
    latitude: f32,
    /// Longitude of the location.
    longitude: f32,
}

#[derive(serde::Deserialize, JsonSchema)]
pub struct MCPAlertRequest {
    /// Two-letter US state code (e.g. CA, NY).
    state: String,
}
现在让我们使用工具处理程序来实现主要的天气服务器结构:
#[derive(Clone)]
pub struct Weather {
    tool_router: ToolRouter<Weather>,
}

#[tool_router(router = tool_router)]
impl Weather {
    fn new() -> Self {
        Self {
            tool_router: Self::tool_router(),
        }
    }

    #[tool(
        description = "Get weather alerts for a US state.",
        output_schema = schema_for_output::<Vec<Alert>>()
    )]
    async fn get_alerts(
        &self,
        Parameters(MCPAlertRequest { state }): Parameters<MCPAlertRequest>,
    ) -> Result<CallToolResult, ErrorData> {
        let state = state.to_uppercase();
        let url = format!("{NWS_API_BASE}/alerts/active/area/{state}");

        let Ok(data) = make_nws_request::<AlertsResponse>(&url).await else {
            return Ok(CallToolResult::error(vec![ContentBlock::text(format!(
                "Unable to fetch alerts for {state}."
            ))]));
        };

        // An empty result is an empty array, not an error.
        let alerts: Vec<Alert> = data
            .features
            .into_iter()
            .map(|feature| {
                let props = feature.properties;
                Alert {
                    event: props.event.unwrap_or_else(|| "Unknown".into()),
                    area: props.area_desc.unwrap_or_else(|| "Unknown".into()),
                    severity: props.severity.unwrap_or_else(|| "Unknown".into()),
                    description: props
                        .description
                        .unwrap_or_else(|| "No description available".into()),
                    instructions: props
                        .instruction
                        .unwrap_or_else(|| "No specific instructions provided".into()),
                }
            })
            .collect();

        let text = if alerts.is_empty() {
            "No active alerts for this state.".to_string()
        } else {
            alerts
                .iter()
                .map(format_alert)
                .collect::<Vec<_>>()
                .join("\n---\n")
        };

        dual_channel_result(text, &alerts)
    }

    #[tool(
        description = "Get weather forecast for a location.",
        output_schema = schema_for_output::<Forecast>()
    )]
    async fn get_forecast(
        &self,
        Parameters(MCPForecastRequest {
            latitude,
            longitude,
        }): Parameters<MCPForecastRequest>,
    ) -> Result<CallToolResult, ErrorData> {
        let points_url = format!("{NWS_API_BASE}/points/{latitude},{longitude}");
        let Ok(points_data) = make_nws_request::<PointsResponse>(&points_url).await else {
            return Ok(CallToolResult::error(vec![ContentBlock::text(
                "Unable to fetch forecast data for this location.",
            )]));
        };

        let forecast_url = points_data.properties.forecast;
        let Ok(forecast_data) = make_nws_request::<ForecastResponse>(&forecast_url).await else {
            return Ok(CallToolResult::error(vec![ContentBlock::text(
                "Unable to fetch detailed forecast.",
            )]));
        };

        let forecast = Forecast {
            latitude,
            longitude,
            periods: forecast_data
                .properties
                .periods
                .into_iter()
                .take(5) // Next 5 periods only
                .map(|p| Period {
                    name: p.name,
                    temperature: p.temperature,
                    temperature_unit: p.temperature_unit,
                    wind_speed: p.wind_speed,
                    wind_direction: p.wind_direction,
                    detailed_forecast: p.detailed_forecast,
                })
                .collect(),
        };

        let text = forecast
            .periods
            .iter()
            .map(format_period)
            .collect::<Vec<_>>()
            .join("\n---\n");

        dual_channel_result(text, &forecast)
    }
}
#[tool_router] 宏自动生成路由逻辑,#[tool] 属性将方法标记为 MCP 工具。每个工具声明一个 output_schema 并返回 Result<CallToolResult, ErrorData>。对天气服务的请求失败时用 CallToolResult::error 上报,客户端会把它当作工具失败。
实现服务器处理程序
实现 ServerHandler 特征来声明服务器的名称、版本和能力:
#[tool_handler(router = self.tool_router)]
impl ServerHandler for Weather {
    fn get_info(&self) -> ServerConfig {
        let mut info = ServerConfig::default();
        // Without this the server reports rmcp's own crate name and version
        // rather than its own.
        info.server_info = Implementation::new("weather", "1.0.0");
        info.capabilities = ServerCapabilities::builder().enable_tools().build();
        info
    }
}
get_info 返回一个 ServerConfig。设置 server_info 让服务器在 initialize 响应里使用自己的名称和版本。
运行服务器
最后,实现使用 stdio 传输运行服务器的 main 函数:
#[tokio::main]
async fn main() -> Result<()> {
    let service = Weather::new().serve(stdio()).await?;
    service.waiting().await?;
    Ok(())
}
使用以下内容构建您的服务器:
cargo build --release编译后的二进制文件将位于 target/release/weather 中。
现在让我们从现有的 MCP 主机 Claude for Desktop 测试您的服务器。
可选:使用 Claude for Desktop 集成测试
首先,确保您安装了 Claude for Desktop。 您可以在此处安装最新版本。 如果您已经有 Claude for Desktop,请确保它已更新到最新版本。
我们需要为您要使用的任何 MCP 服务器配置 Claude for Desktop。为此,请在文本编辑器中打开位于 ~/Library/Application Support/Claude/claude_desktop_config.json 的 Claude for Desktop App 配置。如果该文件不存在,请确保创建该文件。
例如,如果您安装了 VS Code:
code ~/.config/Claude/claude_desktop_config.jsoncode ~/Library/Application\ Support/Claude/claude_desktop_config.jsoncode $env:AppData\Claude\claude_desktop_config.json然后,您将在 mcpServers 密钥中添加您的服务器。仅当至少正确配置了一台服务器时,MCP UI 元素才会显示在 Claude for Desktop 中。
在本例中,我们将添加单一天气服务器,如下所示:
{
  "mcpServers": {
    "weather": {
      "command": "/ABSOLUTE/PATH/TO/PARENT/FOLDER/weather/target/release/weather"
    }
  }
}
{
"mcpServers": {
"weather": {
"command": "C:\\ABSOLUTE\\PATH\\TO\\PARENT\\FOLDER\\weather\\target\\release\\weather.exe"
}
}
}pwd 或 Windows 命令提示符上的 cd 来获取此信息。在 Windows 上,请记住在 JSON 路径中使用双反斜杠 (\\) 或正斜杠 (/),并添加 .exe 扩展名。这告诉 Claude for Desktop:
- 有一个名为“weather”的 MCP 服务器
- 通过在指定路径运行编译的二进制文件来启动它
保存文件,然后重新启动 Claude for Desktop。
Go
让我们开始构建我们的天气服务器! 您可以在这里找到我们将要构建的完整代码。
必备知识
本快速入门假设您熟悉:
- 去
- Claude 等 LLM
MCP 服务器日志记录
实现 MCP 服务器时,请注意如何处理日志记录:
对于基于 STDIO 的服务器: 切勿使用 fmt.Println() 或 fmt.Printf(),因为它们会写入标准输出 (stdout)。写入 stdout 会损坏 JSON-RPC 消息并破坏您的服务器。
对于基于 HTTP 的服务器: 标准输出日志记录很好,因为它不会干扰 HTTP 响应。
最佳实践
- 使用
log.Println()(默认为 stderr)或写入 stderr 或文件的日志库。 - 使用
fmt.Fprintf(os.Stderr, ...)显式写入 stderr。
快速示例
// ❌ Bad (STDIO)
fmt.Println("Processing request")

// ✅ Good (STDIO)
log.Println("Processing request") // defaults to stderr

// ✅ Good (STDIO)
fmt.Fprintln(os.Stderr, "Processing request")
系统要求
- 安装 Go 1.25 或更高版本。
设置您的环境
首先,如果您还没有安装 Go,请安装它。您可以从 go.dev 下载并安装 Go。
验证您的 Go 安装:
go version现在,让我们创建并设置我们的项目:
# Create a new directory for our project
mkdir weather
cd weather

# Initialize Go module
go mod init weather

# Install dependencies
go get github.com/modelcontextprotocol/go-sdk/mcp

# Create our server file
touch main.go
# Create a new directory for our project
md weather
cd weather
# Initialize Go module
go mod init weather
# Install dependencies
go get github.com/modelcontextprotocol/go-sdk/mcp
# Create our server file
new-item main.go现在让我们深入构建您的服务器。
构建您的服务器
导入包和常量
将这些添加到 main.go 的顶部:
package main

import (
	"cmp"
	"context"
	"encoding/json"
	"fmt"
	"io"
	"log"
	"net/http"
	"strings"

	"github.com/modelcontextprotocol/go-sdk/mcp"
)

const (
	NWSAPIBase = "https://api.weather.gov"
	UserAgent  = "weather-app/1.0"
)
数据结构
接下来,让我们定义我们的工具使用的数据结构:
type PointsResponse struct {
	Properties struct {
		Forecast string `json:"forecast"`
	} `json:"properties"`
}

type ForecastResponse struct {
	Properties struct {
		Periods []ForecastPeriod `json:"periods"`
	} `json:"properties"`
}

type ForecastPeriod struct {
	Name             string `json:"name"`
	Temperature      int    `json:"temperature"`
	TemperatureUnit  string `json:"temperatureUnit"`
	WindSpeed        string `json:"windSpeed"`
	WindDirection    string `json:"windDirection"`
	DetailedForecast string `json:"detailedForecast"`
}

type AlertsResponse struct {
	Features []AlertFeature `json:"features"`
}

type AlertFeature struct {
	Properties AlertProperties `json:"properties"`
}

type AlertProperties struct {
	Event       string `json:"event"`
	AreaDesc    string `json:"areaDesc"`
	Severity    string `json:"severity"`
	Description string `json:"description"`
	Instruction string `json:"instruction"`
}

type ForecastInput struct {
	Latitude  float64 `json:"latitude" jsonschema:"Latitude of the location"`
	Longitude float64 `json:"longitude" jsonschema:"Longitude of the location"`
}

type AlertsInput struct {
	State string `json:"state" jsonschema:"Two-letter US state code (e.g. CA, NY)"`
}
辅助函数
接下来,我们添加辅助函数来查询和格式化来自国家气象服务 API 的数据:
func makeNWSRequest[T any](ctx context.Context, url string) (*T, error) {
	req, err := http.NewRequestWithContext(ctx, http.MethodGet, url, nil)
	if err != nil {
		return nil, fmt.Errorf("failed to create request: %w", err)
	}

	req.Header.Set("User-Agent", UserAgent)
	req.Header.Set("Accept", "application/geo+json")

	client := http.DefaultClient
	resp, err := client.Do(req)
	if err != nil {
		return nil, fmt.Errorf("failed to make request to %s: %w", url, err)
	}
	defer resp.Body.Close()

	if resp.StatusCode != http.StatusOK {
		body, _ := io.ReadAll(resp.Body)
		return nil, fmt.Errorf("HTTP error %d: %s", resp.StatusCode, string(body))
	}

	var result T
	if err := json.NewDecoder(resp.Body).Decode(&result); err != nil {
		return nil, fmt.Errorf("failed to decode response: %w", err)
	}

	return &result, nil
}

func formatAlert(alert AlertFeature) string {
	props := alert.Properties
	event := cmp.Or(props.Event, "Unknown")
	areaDesc := cmp.Or(props.AreaDesc, "Unknown")
	severity := cmp.Or(props.Severity, "Unknown")
	description := cmp.Or(props.Description, "No description available")
	instruction := cmp.Or(props.Instruction, "No specific instructions provided")

	return fmt.Sprintf(`
Event: %s
Area: %s
Severity: %s
Description: %s
Instructions: %s
`, event, areaDesc, severity, description, instruction)
}

func formatPeriod(period ForecastPeriod) string {
	return fmt.Sprintf(`
%s:
Temperature: %d°%s
Wind: %s %s
Forecast: %s
`, period.Name, period.Temperature, period.TemperatureUnit,
		period.WindSpeed, period.WindDirection, period.DetailedForecast)
}
实施工具执行
工具执行处理程序负责实际执行每个工具的逻辑。让我们添加它:
func getForecast(ctx context.Context, req *mcp.CallToolRequest, input ForecastInput) (
	*mcp.CallToolResult, any, error,
) {
	// Get points data
	pointsURL := fmt.Sprintf("%s/points/%f,%f", NWSAPIBase, input.Latitude, input.Longitude)
	pointsData, err := makeNWSRequest[PointsResponse](ctx, pointsURL)
	if err != nil {
		return &mcp.CallToolResult{
			Content: []mcp.Content{
				&mcp.TextContent{Text: "Unable to fetch forecast data for this location."},
			},
		}, nil, nil
	}

	// Get forecast data
	forecastURL := pointsData.Properties.Forecast
	if forecastURL == "" {
		return &mcp.CallToolResult{
			Content: []mcp.Content{
				&mcp.TextContent{Text: "Unable to fetch forecast URL."},
			},
		}, nil, nil
	}

	forecastData, err := makeNWSRequest[ForecastResponse](ctx, forecastURL)
	if err != nil {
		return &mcp.CallToolResult{
			Content: []mcp.Content{
				&mcp.TextContent{Text: "Unable to fetch detailed forecast."},
			},
		}, nil, nil
	}

	// Format the periods
	periods := forecastData.Properties.Periods
	if len(periods) == 0 {
		return &mcp.CallToolResult{
			Content: []mcp.Content{
				&mcp.TextContent{Text: "No forecast periods available."},
			},
		}, nil, nil
	}

	// Show next 5 periods
	var forecasts []string
	for i := range min(5, len(periods)) {
		forecasts = append(forecasts, formatPeriod(periods[i]))
	}

	result := strings.Join(forecasts, "\n---\n")

	return &mcp.CallToolResult{
		Content: []mcp.Content{
			&mcp.TextContent{Text: result},
		},
	}, nil, nil
}

func getAlerts(ctx context.Context, req *mcp.CallToolRequest, input AlertsInput) (
	*mcp.CallToolResult, any, error,
) {
	// Build alerts URL
	stateCode := strings.ToUpper(input.State)
	alertsURL := fmt.Sprintf("%s/alerts/active/area/%s", NWSAPIBase, stateCode)

	alertsData, err := makeNWSRequest[AlertsResponse](ctx, alertsURL)
	if err != nil {
		return &mcp.CallToolResult{
			Content: []mcp.Content{
				&mcp.TextContent{Text: "Unable to fetch alerts or no alerts found."},
			},
		}, nil, nil
	}

	// Check if there are any alerts
	if len(alertsData.Features) == 0 {
		return &mcp.CallToolResult{
			Content: []mcp.Content{
				&mcp.TextContent{Text: "No active alerts for this state."},
			},
		}, nil, nil
	}

	// Format alerts
	var alerts []string
	for _, feature := range alertsData.Features {
		alerts = append(alerts, formatAlert(feature))
	}

	result := strings.Join(alerts, "\n---\n")

	return &mcp.CallToolResult{
		Content: []mcp.Content{
			&mcp.TextContent{Text: result},
		},
	}, nil, nil
}
运行服务器
最后,实现运行服务器的main函数:
func main() {
	// Create MCP server
	server := mcp.NewServer(&mcp.Implementation{
		Name:    "weather",
		Version: "1.0.0",
	}, nil)

	// Add get_forecast tool
	mcp.AddTool(server, &mcp.Tool{
		Name:        "get_forecast",
		Description: "Get weather forecast for a location",
	}, getForecast)

	// Add get_alerts tool
	mcp.AddTool(server, &mcp.Tool{
		Name:        "get_alerts",
		Description: "Get weather alerts for a US state",
	}, getAlerts)

	// Run server on stdio transport
	if err := server.Run(context.Background(), &mcp.StdioTransport{}); err != nil {
		log.Fatal(err)
	}
}
使用以下内容构建您的服务器:
go build -o weather .编译后的二进制文件将位于 ./weather 中。
现在让我们从现有的 MCP 主机 Claude for Desktop 测试您的服务器。
可选:使用 Claude for Desktop 集成测试
首先,确保您安装了 Claude for Desktop。 您可以在此处安装最新版本。 如果您已经有 Claude for Desktop,请确保它已更新到最新版本。
我们需要为您要使用的任何 MCP 服务器配置 Claude for Desktop。为此,请在文本编辑器中打开位于 ~/Library/Application Support/Claude/claude_desktop_config.json 的 Claude for Desktop App 配置。如果该文件不存在,请确保创建该文件。
例如,如果您安装了 VS Code:
code ~/.config/Claude/claude_desktop_config.jsoncode ~/Library/Application\ Support/Claude/claude_desktop_config.jsoncode $env:AppData\Claude\claude_desktop_config.json然后,您将在 mcpServers 密钥中添加您的服务器。仅当至少正确配置了一台服务器时,MCP UI 元素才会显示在 Claude for Desktop 中。
在本例中,我们将添加单一天气服务器,如下所示:
{
  "mcpServers": {
    "weather": {
      "command": "/ABSOLUTE/PATH/TO/PARENT/FOLDER/weather/weather"
    }
  }
}
{
"mcpServers": {
"weather": {
"command": "C:\\ABSOLUTE\\PATH\\TO\\PARENT\\FOLDER\\weather\\weather.exe"
}
}
}pwd 或 Windows 命令提示符上的 cd 来获取此信息。在 Windows 上,请记住在 JSON 路径中使用双反斜杠 (\\) 或正斜杠 (/),并添加 .exe 扩展名。这告诉 Claude for Desktop:
- 有一个名为“weather”的 MCP 服务器
- 通过在指定路径运行编译的二进制文件来启动它
保存文件,然后重新启动 Claude for Desktop。
使用命令进行测试
让我们确保 Claude for Desktop 正在使用我们在 weather 服务器中公开的两个工具。您可以通过查找“添加文件、连接器等/” 图标来执行此操作:
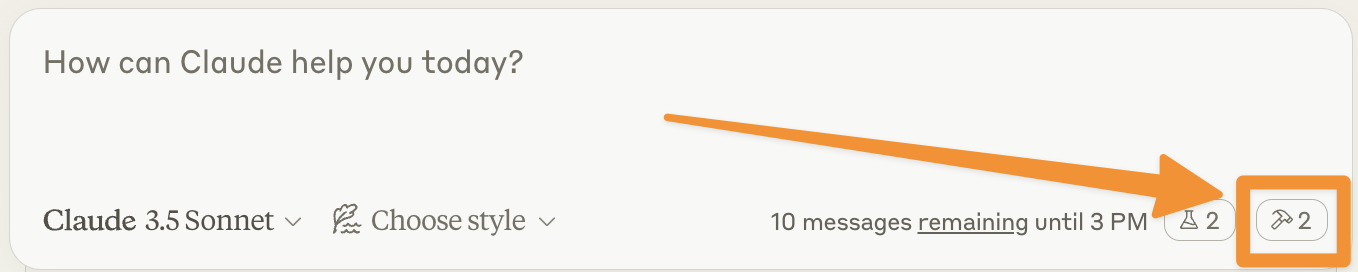
单击加号图标后,将鼠标悬停在“连接器”菜单上。您应该看到列出的 weather 服务器:
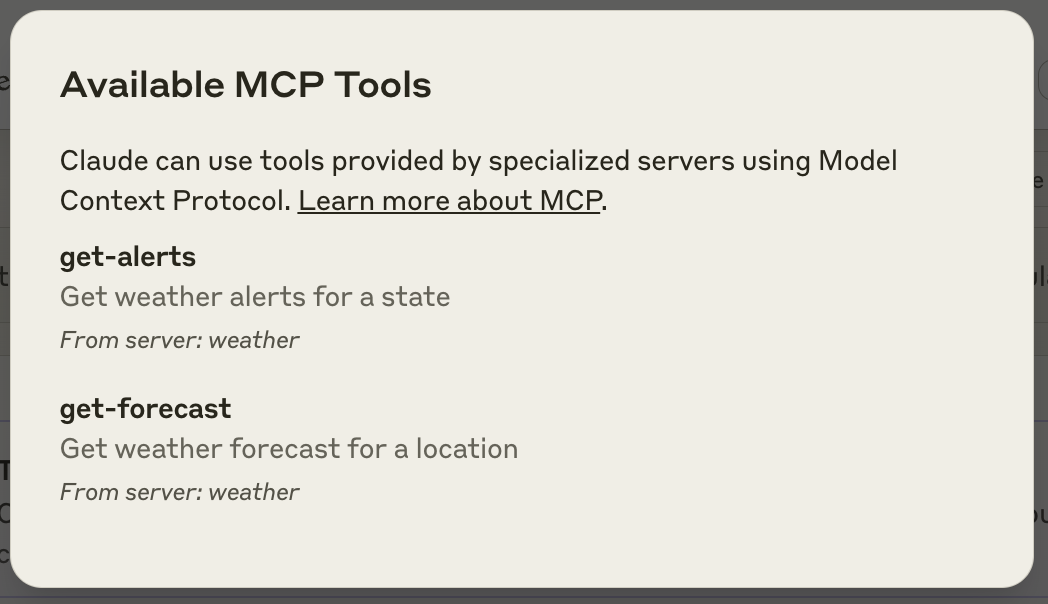
如果 Claude for Desktop 没有识别您的服务器,请继续阅读故障排除部分以获取调试提示。
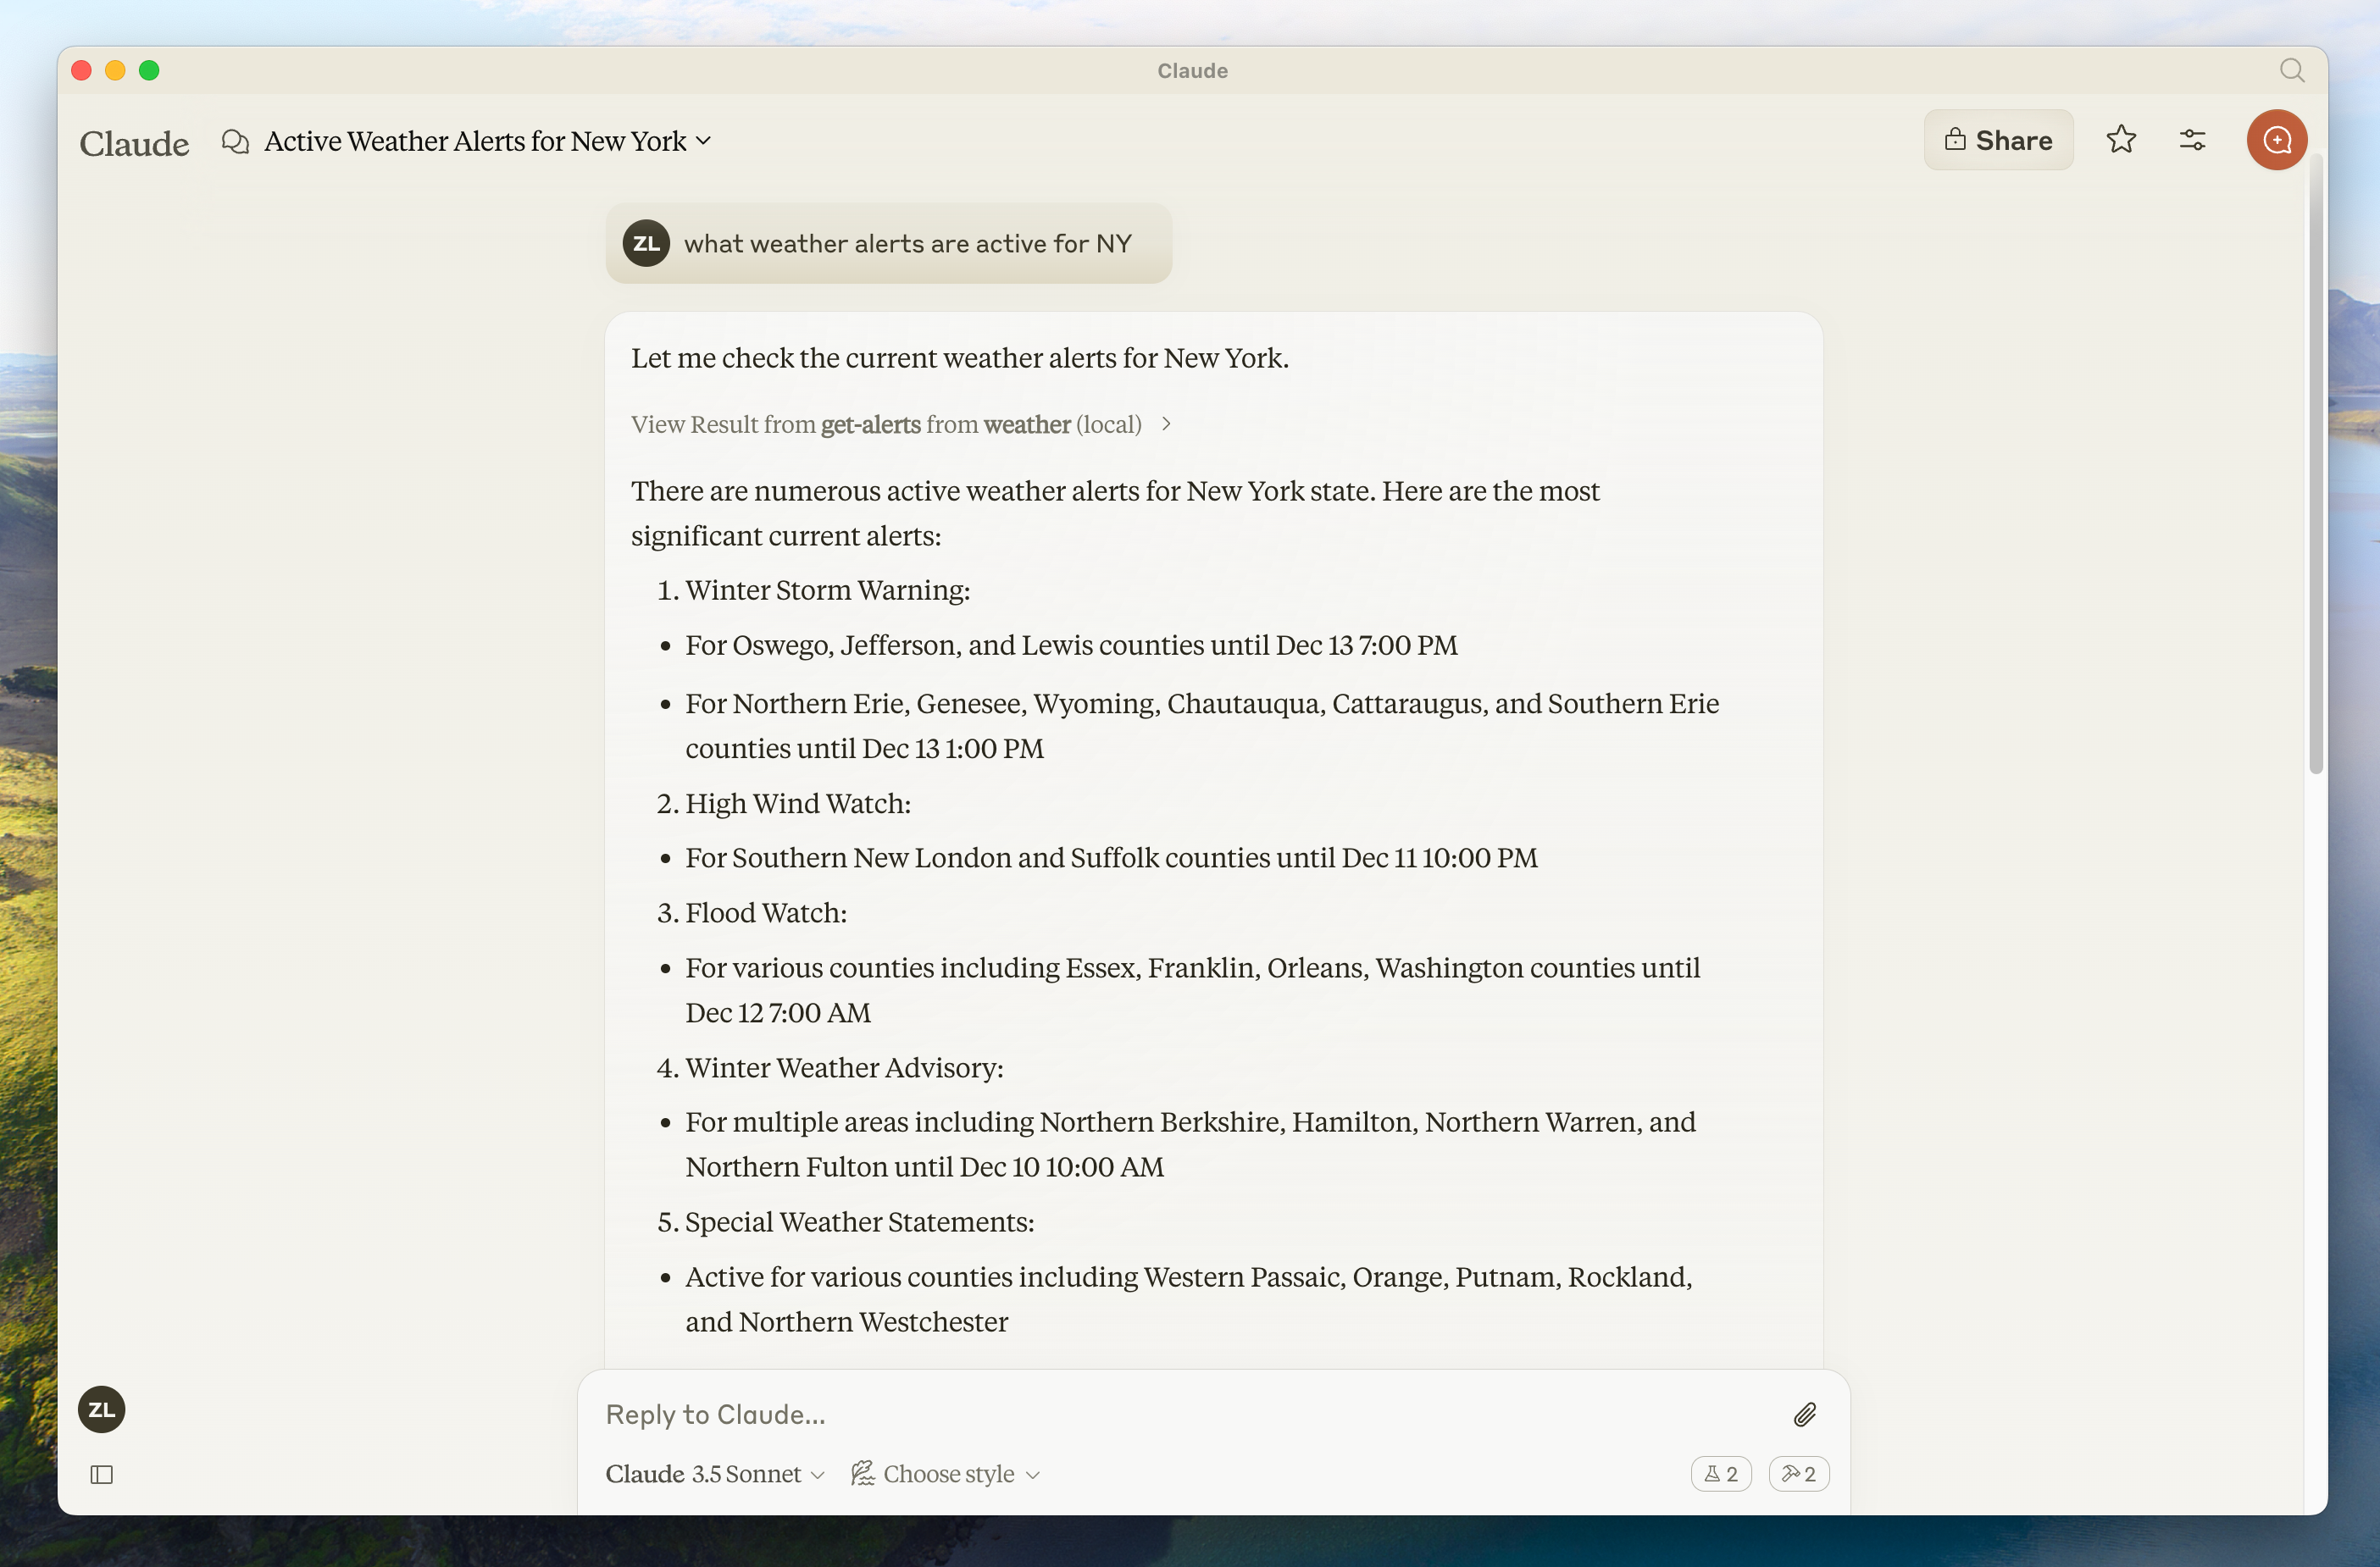
如果服务器已显示在“连接器”菜单中,您现在可以通过在 Claude for Desktop 中运行以下命令来测试服务器:
- 萨克拉门托 的天气怎么样?
- 德克萨斯州有哪些活跃的天气警报?
幕后发生了什么
当你提出问题时:
- 客户端将您的问题发送给 Claude
- Claude 分析可用的工具并决定使用哪些工具
- 客户端通过 MCP 服务器执行所选工具
- 结果被发送回 Claude
- Claude 生成自然语言响应
- 回复已显示给您!
故障排除
Claude 桌面集成问题
从 Claude for Desktop 获取日志
与 MCP 相关的 Claude.app 日志记录写入 ~/Library/Logs/Claude (macOS) 或 ~/.config/Claude/logs/ (Linux) 中的日志文件:
mcp.log将包含有关 MCP 连接和连接失败的常规日志记录。- 名为
mcp-server-SERVERNAME.log的文件将包含来自指定服务器的 stderr 输出。 Stdio 服务器可能使用 stderr 进行所有日志记录,因此这些文件不仅限于错误。
您可以运行以下命令来列出最近的日志并跟踪任何新日志:
# Check Claude's logs for errors
tail -n 20 -f ~/Library/Logs/Claude/mcp*.log
# Check Claude's logs for errors
tail -n 20 -f ~/.config/Claude/logs/mcp*.log服务器未出现在 Claude 中
- 检查您的
claude_desktop_config.json文件语法 - 确保项目的路径是绝对路径而不是相对路径
- 完全重新启动 Claude for Desktop
要正确重新启动 Claude for Desktop,您必须完全退出该应用程序:
- Windows:右键单击系统托盘中的 Claude 图标(该图标可能隐藏在“隐藏图标”菜单中),然后选择“Quit”或“Exit”。
- macOS:使用 Cmd+Q 或从菜单栏中选择“退出 Claude”。
- Linux:右键单击系统托盘中的 Claude 图标并选择“退出”,或从终端运行
pkill -f claude-desktop。
仅关闭窗口并不会完全退出应用程序,并且您的 MCP 服务器配置更改将不会生效。
工具调用默默失败
如果 Claude 尝试使用这些工具但失败了:
- 检查 Claude 的日志是否有错误
- 验证您的服务器构建和运行没有错误
- 尝试重新启动 Claude for Desktop
这些都不起作用。我该怎么办?
请参考我们的调试指南,了解更好的调试工具和更详细的指导。
天气 API 问题
错误:无法检索网格点数据
这通常意味着:
- 坐标在美国境外
- NWS API 有问题
- 您受到限流
修复方法:
- 验证您使用的是美国坐标
- 在请求之间添加一点延迟
- 检查NWS API状态页面
错误:[STATE] 没有活动警报
这不是错误 - 它只是意味着该州当前没有天气警报。尝试不同的状态或在恶劣天气期间检查。
后续步骤
构建客户端
了解如何构建您自己的可以连接到您的服务器的 MCP 客户端
示例服务器
查看我们的官方 MCP 服务器和实施图库
调试指南
了解如何有效调试 MCP 服务器和集成
使用特工技能构建
使用代理技能指导 AI 编码助手完成服务器设计