快速入门
在本教程中,我们将构建一个简单的 MCP 天气服务器并将其连接到宿主(Claude for Desktop)。我们将从基本设置开始,然后逐步过渡到更复杂的用例。
我们要构建什么
许多 LLM(包括 Claude)目前还没有获取天气预报和严重天气警报的能力。让我们用 MCP 来解决这个问题!
我们将构建一个暴露两个工具的服务器:get-alerts 和 get-forecast。然后我们将服务器连接到 MCP 宿主(在这个例子中是 Claude for Desktop):

为什么选择 Claude for Desktop 而不是 Claude.ai?
MCP 核心概念
MCP 服务器可以提供三种主要类型的功能:
- 资源(Resources): 客户端可以读取的文件类数据(如 API 响应或文件内容)
- 工具(Tools): 可以由 LLM 调用的函数(需要用户批准)
- 提示(Prompts): 帮助用户完成特定任务的预写模板
本教程重点介绍工具,但如果你想了解更多关于资源和提示的内容,我们也有进阶教程。
前置知识
此快速入门假设你熟悉:
- Python
- LLM(如 Claude)
系统要求
对于 Python,请确保你安装了 Python 3.9 或更高版本。
配置环境
首先,让我们安装 uv 并设置 Python 项目和环境:
curl -LsSf https://astral.sh/uv/install.sh | shpowershell -ExecutionPolicy ByPass -c "irm https://astral.sh/uv/install.ps1 | iex"安装后请重启终端以确保 uv 命令可用。
现在,让我们创建并设置项目:
# 创建项目新目录
uv init weather
cd weather

# 创建虚拟环境并激活
uv venv
source .venv/bin/activate

# 安装依赖
uv add mcp httpx

# 删除模板文件
rm hello.py

# 创建所需文件
mkdir -p src/weather
touch src/weather/__init__.py
touch src/weather/server.py
# 创建项目新目录
uv init weather
cd weather
# 创建虚拟环境并激活
uv venv
.venv\Scripts\activate
# 安装依赖
uv add mcp httpx
# 删除样板代码
rm hello.py
# 创建所需文件
md src
md src\weather
new-item src\weather\__init__.py
new-item src\weather\server.py在 pyproject.toml 中添加以下代码:
...rest of config

[build-system]
requires = [ "hatchling",]
build-backend = "hatchling.build"

[project.scripts]
weather = "weather:main"
在 __init__.py 中添加以下代码:
from . import server
import asyncio

def main():
    """包的主入口点。"""
    asyncio.run(server.main())

# 可选:在包级别暴露其他重要项
__all__ = ['main', 'server']
现在让我们开始构建服务器。
构建服务器
导入包
在 server.py 顶部添加以下内容:
from typing import Any
import asyncio
import httpx
from mcp.server.models import InitializationOptions
import mcp.types as types
from mcp.server import NotificationOptions, Server
import mcp.server.stdio
设置实例
然后初始化服务器实例和 NWS API 的基础 URL:
NWS_API_BASE = "https://api.weather.gov"
USER_AGENT = "weather-app/1.0"

server = Server("weather")
实现工具列表
我们需要告诉客户端有哪些工具可用。list_tools() 装饰器注册此处理程序:
@server.list_tools()
async def handle_list_tools() -> list[types.Tool]:
    """
    列出可用的工具。
    每个工具使用 JSON Schema 验证来指定其参数。
    """
    return [
        types.Tool(
            name="get-alerts",
            description="获取某个州的天气预警",
            inputSchema={
                "type": "object",
                "properties": {
                    "state": {
                        "type": "string",
                        "description": "两字母州代码(如 CA, NY)",
                    },
                },
                "required": ["state"],
            },
        ),
        types.Tool(
            name="get-forecast",
            description="获取某个位置的天气预报",
            inputSchema={{
                "type": "object",
                "properties": {
                    "latitude": {
                        "type": "number",
                        "description": "位置的纬度",
                    },
                    "longitude": {
                        "type": "number",
                        "description": "位置的经度",
                    },
                },
                "required": ["latitude", "longitude"],
            },
        ),
]这定义了我们的两个工具:get-alerts 和 get-forecast。
辅助函数
接下来,让我们添加用于查询和格式化国家气象服务 API 数据的辅助函数:
async def make_nws_request(client: httpx.AsyncClient, url: str) -> dict[str, Any] | None:
    """发送 NWS API 请求并进行适当的错误处理。"""
    headers = {
        "User-Agent": USER_AGENT,
        "Accept": "application/geo+json"
    }

    try:
        response = await client.get(url, headers=headers, timeout=30.0)
        response.raise_for_status()
        return response.json()
    except Exception:
        return None

def format_alert(feature: dict) -> str:
    """将预警特征格式化为简明的字符串。"""
    props = feature["properties"]
    return (
        f"事件: {props.get('event', '未知')}\n"
        f"区域: {props.get('areaDesc', '未知')}\n"
        f"严重程度: {props.get('severity', '未知')}\n"
        f"状态: {props.get('status', '未知')}\n"
        f"标题: {props.get('headline', '无标题')}\n"
        "---"
    )
实现工具执行
工具执行处理程序负责实际执行每个工具的逻辑。让我们添加它:
@server.call_tool()
async def handle_call_tool(
    name: str, arguments: dict | None
) -> list[types.TextContent | types.ImageContent | types.EmbeddedResource]:
    """
    处理工具执行请求。
    工具可以获取天气数据并通知客户端变更。
    """
    if not arguments:
        raise ValueError("缺少参数")

    if name == "get-alerts":
        state = arguments.get("state")
        if not state:
            raise ValueError("缺少州参数")

        # 转换州代码为大写以确保格式一致
        state = state.upper()
        if len(state) != 2:
            raise ValueError("州必须是两字母代码(如 CA, NY)")

        async with httpx.AsyncClient() as client:
            alerts_url = f"{NWS_API_BASE}/alerts?area={state}"
            alerts_data = await make_nws_request(client, alerts_url)

            if not alerts_data:
                return [types.TextContent(type="text", text="获取预警数据失败")]

            features = alerts_data.get("features", [])
            if not features:
                return [types.TextContent(type="text", text=f"{state} 没有活动预警")]

            # 格式化每个预警为简明字符串
            formatted_alerts = [format_alert(feature) for feature in features[:20]]  # 仅取前20个预警
            alerts_text = f"{state} 的活动预警:\n\n" + "\n".join(formatted_alerts)

            return [
                types.TextContent(
                    type="text",
                    text=alerts_text
                )
            ]
    elif name == "get-forecast":
        try:
            latitude = float(arguments.get("latitude"))
            longitude = float(arguments.get("longitude"))
        except (TypeError, ValueError):
            return [types.TextContent(
                type="text",
                text="无效的坐标。请提供有效的纬度和经度数值。"
            )]

        # 基本坐标验证
        if not (-90 <= latitude <= 90) or not (-180 <= longitude <= 180):
            return [types.TextContent(
                type="text",
                text="无效的坐标。纬度必须在 -90 到 90 之间,经度必须在 -180 到 180 之间。"
            )]

        async with httpx.AsyncClient() as client:
            # 首先获取网格点
            lat_str = f"{latitude}"
            lon_str = f"{longitude}"
            points_url = f"{NWS_API_BASE}/points/{lat_str},{lon_str}"
            points_data = await make_nws_request(client, points_url)

            if not points_data:
                return [types.TextContent(type="text", text=f"无法获取坐标 {latitude}, {longitude} 的网格点数据。此位置可能不受 NWS API 支持(仅支持美国地点)。")]

            # 从响应中提取预报 URL
            properties = points_data.get("properties", {})
            forecast_url = properties.get("forecast")

            if not forecast_url:
                return [types.TextContent(type="text", text="无法从网格点数据获取预报 URL")]

            # 获取预报
            forecast_data = await make_nws_request(client, forecast_url)

            if not forecast_data:
                return [types.TextContent(type="text", text="获取预报数据失败")]

            # 格式化预报时段
            periods = forecast_data.get("properties", {}).get("periods", [])
            if not periods:
                return [types.TextContent(type="text", text="没有可用的预报时段")]

            # 将每个时段格式化为简明字符串
            formatted_forecast = []
            for period in periods:
                forecast_text = (
                    f"{period.get('name', '未知')}:\n"
                    f"温度: {period.get('temperature', '未知')}°{period.get('temperatureUnit', 'F')}\n"
                    f"风: {period.get('windSpeed', '未知')} {period.get('windDirection', '')}\n"
                    f"{period.get('shortForecast', '无可用预报')}\n"
                    "---"
                )
                formatted_forecast.append(forecast_text)

            forecast_text = f"坐标 {latitude}, {longitude} 的预报:\n\n" + "\n".join(formatted_forecast)

            return [types.TextContent(
                type="text",
                text=forecast_text
            )]
    else:
        raise ValueError(f"未知工具: {name}")
运行服务器
最后,实现主函数以运行服务器:
async def main():
    # 使用标准输入/输出流运行服务器
    async with mcp.server.stdio.stdio_server() as (read_stream, write_stream):
        await server.run(
            read_stream,
            write_stream,
            InitializationOptions(
                server_name="weather",
                server_version="0.1.0",
                capabilities=server.get_capabilities(
                    notification_options=NotificationOptions(),
                    experimental_capabilities={},
                ),
            ),
        )

# 如果你想连接到自定义客户端,这是必需的
if __name__ == "__main__":
    asyncio.run(main())
你的服务器已经完成了! 运行 uv run src/weather/server.py 来确认一切正常。
使用命令测试
首先,确保 Claude for Desktop 能够识别到我们在 weather 服务器中暴露的两个工具。你可以通过查找锤子图标 ![]() 来确认:
来确认:

点击锤子图标后,你应该能看到列出的两个工具:

如果你的服务器没有被 Claude for Desktop 识别,请转到故障排除部分获取调试建议。
现在你可以在 Claude for Desktop 中运行以下命令来测试你的服务器:
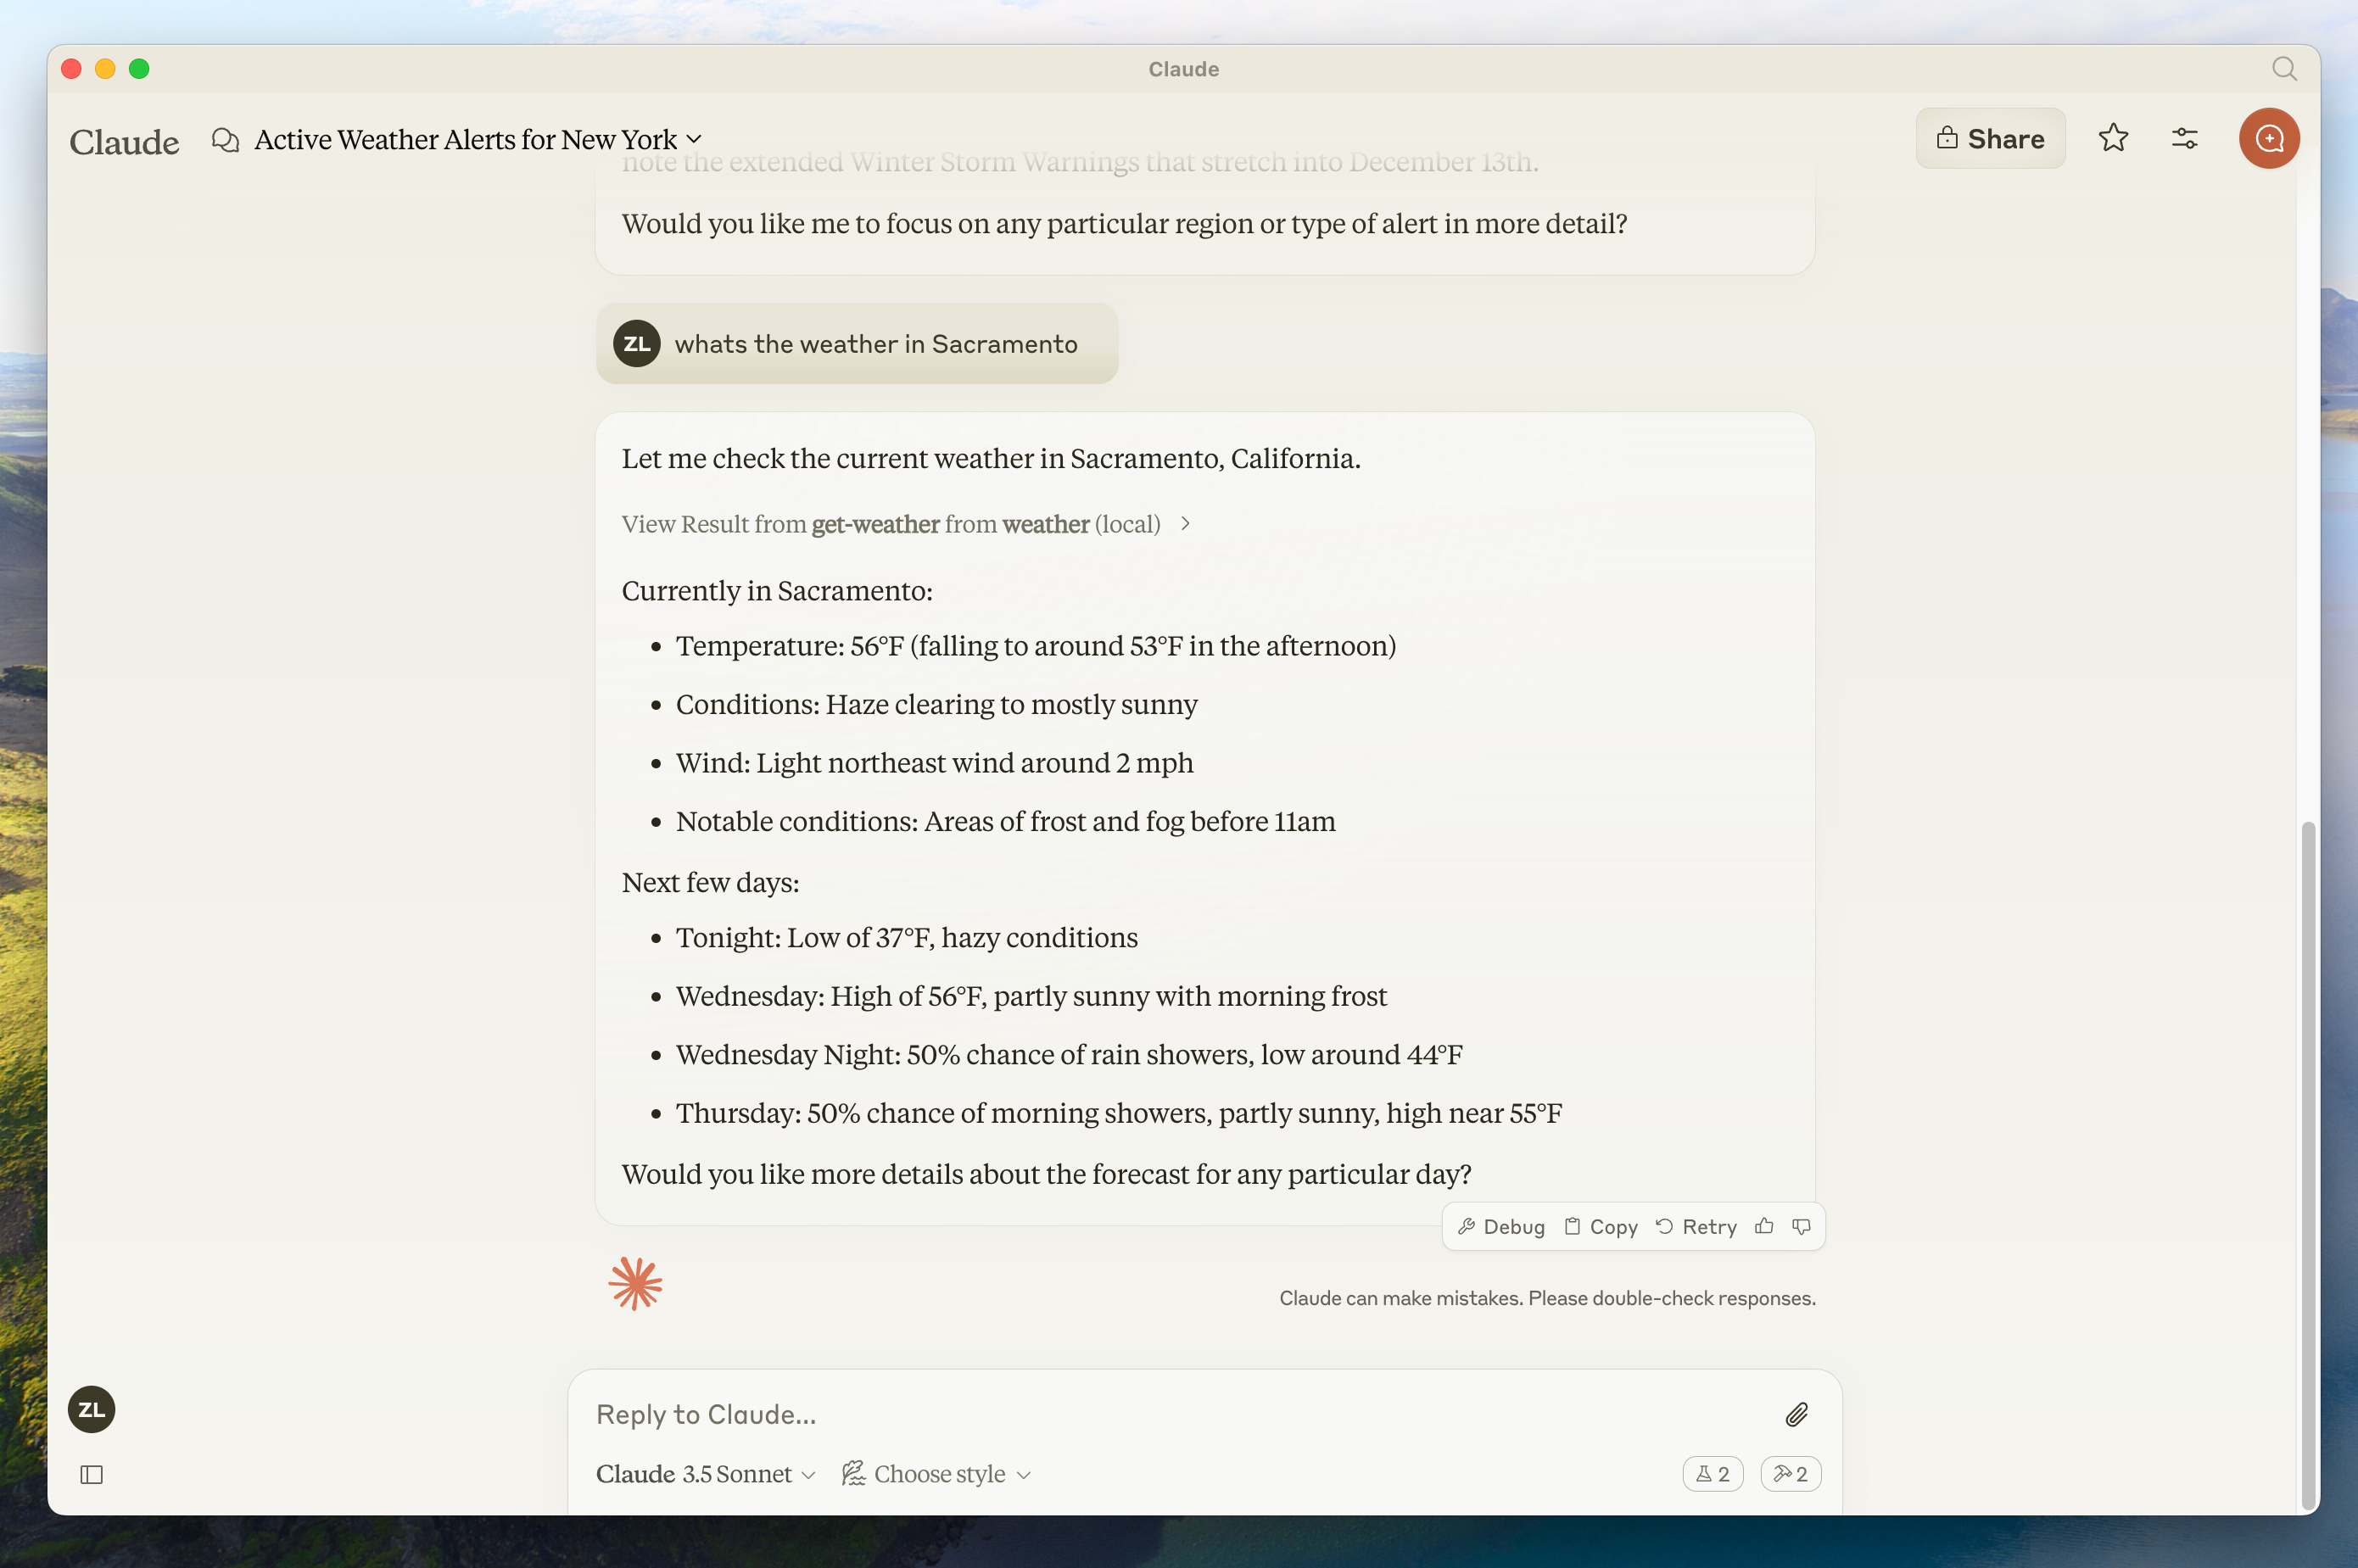
- Sacramento 的天气如何?
- Texas 有哪些活动的天气预警?

幕后原理
当你提出一个问题时:
- 客户端将你的问题发送给 Claude
- Claude 分析可用的工具并决定使用哪些工具
- 客户端通过 MCP 服务器执行选定的工具
- 结果返回给 Claude
- Claude 生成自然语言响应
- 响应显示给你!
故障排除
天气 API 问题
错误:无法获取网格点数据
这通常意味着:
- 坐标在美国境外
- NWS API 出现问题
- 你被限制了请求频率
解决方案:
- 验证你使用的是美国境内的坐标
- 在请求之间添加小的延迟
- 检查 NWS API 状态页面
错误:[州] 没有活动预警
这不是错误 - 这只是意味着该州目前没有天气预警。可以尝试查询其他州或在恶劣天气期间检查。
Claude for Desktop 集成问题
服务器未在 Claude 中显示
- 检查配置文件语法
- 确保项目路径正确
- 完全重启 Claude for Desktop
你也可以这样检查 Claude 的日志:
# 检查 Claude 的错误日志
tail -n 20 -f ~/Library/Logs/Claude/mcp*.log
工具调用静默失败
如果 Claude 尝试使用工具但失败了:
- 检查 Claude 的错误日志
- 验证你的服务器运行无误
- 尝试重启 Claude for Desktop
下一步
前置知识
此快速入门假设你熟悉:
- TypeScript
- LLM(如 Claude)
系统要求
对于 TypeScript,请确保安装了最新版本的 Node.js。
配置环境
首先,如果你还没有安装 Node.js 和 npm,请从 nodejs.org 下载安装。 验证你的 Node.js 安装:
node --version
npm --version
本教程需要 Node.js 16 或更高版本。
现在,让我们创建并设置项目:
# 创建项目新目录
mkdir weather
cd weather

# 初始化新的 npm 项目
npm init -y

# 安装依赖
npm install @modelcontextprotocol/sdk zod
npm install -D @types/node typescript

# 创建文件
mkdir src
touch src/index.ts
# 创建项目新目录
md weather
cd weather
# 初始化新的 npm 项目
npm init -y
# 安装依赖
npm install @modelcontextprotocol/sdk zod
npm install -D @types/node typescript
# 创建文件
md src
new-item src\index.ts更新 package.json 添加 type: “module” 和构建脚本:
{
  "type": "module",
  "bin": {
    "weather": "./build/index.js"
  },
  "scripts": {
    "build": "tsc && node -e \"require('fs').chmodSync('build/index.js', '755')\"",
  },
  "files": [
    "build"
  ],
}
在项目根目录创建 tsconfig.json:
{
  "compilerOptions": {
    "target": "ES2022",
    "module": "Node16",
    "moduleResolution": "Node16",
    "outDir": "./build",
    "rootDir": "./src",
    "strict": true,
    "esModuleInterop": true,
    "skipLibCheck": true,
    "forceConsistentCasingInFileNames": true
  },
  "include": ["src/**/*"],
  "exclude": ["node_modules"]
}
现在让我们开始构建服务器。
构建服务器
导入包
在 src/index.ts 顶部添加以下内容:
import { Server } from "@modelcontextprotocol/sdk/server/index.js";
import { StdioServerTransport } from "@modelcontextprotocol/sdk/server/stdio.js";
import {
  CallToolRequestSchema,
  ListToolsRequestSchema,
} from "@modelcontextprotocol/sdk/types.js";
import { z } from "zod";
设置实例
然后初始化 NWS API 的基础 URL、验证模式和服务器实例:
const NWS_API_BASE = "https://api.weather.gov";
const USER_AGENT = "weather-app/1.0";

// 定义 Zod 模式进行验证
const AlertsArgumentsSchema = z.object({
  state: z.string().length(2),
});

const ForecastArgumentsSchema = z.object({
  latitude: z.number().min(-90).max(90),
  longitude: z.number().min(-180).max(180),
});

// 创建服务器实例
const server = new Server(
  {
    name: "weather",
    version: "1.0.0",
  },
  {
    capabilities: {
      tools: {},
    },
  }
);
实现工具列表
我们需要告诉客户端有哪些工具可用。这个 server.setRequestHandler 调用将为我们注册此列表:
// 列出可用的工具
server.setRequestHandler(ListToolsRequestSchema, async () => {
  return {
    tools: [
      {
        name: "get-alerts",
        description: "获取某个州的天气预警",
        inputSchema: {
          type: "object",
          properties: {
            state: {
              type: "string",
              description: "两字母州代码(如 CA, NY)",
            },
          },
          required: ["state"],
        },
      },
      {
        name: "get-forecast",
        description: "获取某个位置的天气预报",
        inputSchema: {
          type: "object",
          properties: {
            latitude: {
              type: "number",
              description: "位置的纬度",
            },
            longitude: {
              type: "number",
              description: "位置的经度",
            },
          },
          required: ["latitude", "longitude"],
        },
      },
    ],
  };
});这定义了我们的两个工具:get-alerts 和 get-forecast。
辅助函数
接下来,让我们添加用于查询和格式化国家气象服务 API 数据的辅助函数:
// 用于发起 NWS API 请求的辅助函数
async function makeNWSRequest<T>(url: string): Promise<T | null> {
  const headers = {
    "User-Agent": USER_AGENT,
    Accept: "application/geo+json",
  };

  try {
    const response = await fetch(url, { headers });
    if (!response.ok) {
      throw new Error(`HTTP error! status: ${response.status}`);
    }
    return (await response.json()) as T;
  } catch (error) {
    console.error("Error making NWS request:", error);
    return null;
  }
}

interface AlertFeature {
  properties: {
    event?: string;
    areaDesc?: string;
    severity?: string;
    status?: string;
    headline?: string;
  };
}

// 格式化预警数据
function formatAlert(feature: AlertFeature): string {
  const props = feature.properties;
  return [
    `Event: ${props.event || "Unknown"}`,
    `Area: ${props.areaDesc || "Unknown"}`,
    `Severity: ${props.severity || "Unknown"}`,
    `Status: ${props.status || "Unknown"}`,
    `Headline: ${props.headline || "No headline"}`,
    "---",
  ].join("\n");
}

interface ForecastPeriod {
  name?: string;
  temperature?: number;
  temperatureUnit?: string;
  windSpeed?: string;
  windDirection?: string;
  shortForecast?: string;
}

interface AlertsResponse {
  features: AlertFeature[];
}

interface PointsResponse {
  properties: {
    forecast?: string;
  };
}

interface ForecastResponse {
  properties: {
    periods: ForecastPeriod[];
  };
}
实现工具执行
工具执行处理程序负责实际执行每个工具的逻辑。让我们添加它:
// 处理工具执行
server.setRequestHandler(CallToolRequestSchema, async (request) => {
  const { name, arguments: args } = request.params;

  try {
    if (name === "get-alerts") {
      const { state } = AlertsArgumentsSchema.parse(args);
      const stateCode = state.toUpperCase();

      const alertsUrl = `${NWS_API_BASE}/alerts?area=${stateCode}`;
      const alertsData = await makeNWSRequest<AlertsResponse>(alertsUrl);

      if (!alertsData) {
        return {
          content: [
            {
              type: "text",
              text: "Failed to retrieve alerts data",
            },
          ],
        };
      }

      const features = alertsData.features || [];
      if (features.length === 0) {
        return {
          content: [
            {
              type: "text",
              text: `No active alerts for ${stateCode}`,
            },
          ],
        };
      }

      const formattedAlerts = features.map(formatAlert).slice(0, 20) // only take the first 20 alerts;
      const alertsText = `Active alerts for ${stateCode}:\n\n${formattedAlerts.join(
        "\n"
      )}`;

      return {
        content: [
          {
            type: "text",
            text: alertsText,
          },
        ],
      };
    } else if (name === "get-forecast") {
      const { latitude, longitude } = ForecastArgumentsSchema.parse(args);

      // 获取网格点数据
      const pointsUrl = `${NWS_API_BASE}/points/${latitude.toFixed(
        4
      )},${longitude.toFixed(4)}`;
      const pointsData = await makeNWSRequest<PointsResponse>(pointsUrl);

      if (!pointsData) {
        return {
          content: [
            {
              type: "text",
              text: `Failed to retrieve grid point data for coordinates: ${latitude}, ${longitude}. This location may not be supported by the NWS API (only US locations are supported).`,
            },
          ],
        };
      }

      const forecastUrl = pointsData.properties?.forecast;
      if (!forecastUrl) {
        return {
          content: [
            {
              type: "text",
              text: "Failed to get forecast URL from grid point data",
            },
          ],
        };
      }

      // 获取预报数据
      const forecastData = await makeNWSRequest<ForecastResponse>(forecastUrl);
      if (!forecastData) {
        return {
          content: [
            {
              type: "text",
              text: "Failed to retrieve forecast data",
            },
          ],
        };
      }

      const periods = forecastData.properties?.periods || [];
      if (periods.length === 0) {
        return {
          content: [
            {
              type: "text",
              text: "No forecast periods available",
            },
          ],
        };
      }

      // 格式化预报时段
      const formattedForecast = periods.map((period: ForecastPeriod) =>
        [
          `${period.name || "Unknown"}:`,
          `Temperature: ${period.temperature || "Unknown"}°${
            period.temperatureUnit || "F"
          }`,
          `Wind: ${period.windSpeed || "Unknown"} ${
            period.windDirection || ""
          }`,
          `${period.shortForecast || "No forecast available"}`,
          "---",
        ].join("\n")
      );

      const forecastText = `Forecast for ${latitude}, ${longitude}:\n\n${formattedForecast.join(
        "\n"
      )}`;

      return {
        content: [
          {
            type: "text",
            text: forecastText,
          },
        ],
      };
    } else {
      throw new Error(`Unknown tool: ${name}`);
    }
  } catch (error) {
    if (error instanceof z.ZodError) {
      throw new Error(
        `Invalid arguments: ${error.errors
          .map((e) => `${e.path.join(".")}: ${e.message}`)
          .join(", ")}`
      );
    }
    throw error;
  }
});
运行服务器
最后,实现主函数以运行服务器:
// 启动服务器
async function main() {
  const transport = new StdioServerTransport();
  await server.connect(transport);
  console.error("Weather MCP Server running on stdio");
}

main().catch((error) => {
  console.error("Fatal error in main():", error);
  process.exit(1);
});
确保运行 npm run build 来构建你的服务器! 这是让你的服务器连接的非常重要的一步。
现在让我们从现有的 MCP 宿主 Claude for Desktop 测试你的服务器。
使用 Claude for Desktop 测试你的服务器
首先,确保你已经安装了 Claude for Desktop。你可以在这里下载最新版本。
接下来,在文本编辑器中打开 Claude for Desktop 应用配置 ~/Library/Application Support/Claude/claude_desktop_config.json。
例如,如果你安装了 VS Code:
code ~/Library/Application\ Support/Claude/claude_desktop_config.jsoncode $env:AppData\Claude\claude_desktop_config.json添加此配置(替换父文件夹路径):
{
    "mcpServers": {
        "weather": {
            "command": "node",
            "args": [
                "/ABSOLUTE/PATH/TO/PARENT/FOLDER/weather/build/index.js"
            ]
        }
    }
}
{
"mcpServers": {
"weather": {
"command": "node",
"args": [
"C:\\PATH\\TO\\PARENT\\FOLDER\\weather\\build\\index.js"
]
}
}
}这告诉 Claude for Desktop:
- 有一个名为 “weather” 的 MCP 服务器
- 通过运行
node /ABSOLUTE/PATH/TO/PARENT/FOLDER/weather/build/index.js启动它
保存文件,并重启 Claude for Desktop。
使用命令测试
首先,确保 Claude for Desktop 能够识别到我们在 weather 服务器中暴露的两个工具。你可以通过查找锤子图标 ![]() 来确认:
来确认:
点击锤子图标后,你应该能看到列出的两个工具:
如果你的服务器没有被 Claude for Desktop 识别,请转到故障排除部分获取调试建议。
现在你可以在 Claude for Desktop 中运行以下命令来测试你的服务器:
- Sacramento 的天气如何?
- Texas 有哪些活动的天气预警?
幕后原理
当你提出一个问题时:
- 客户端将你的问题发送给 Claude
- Claude 分析可用的工具并决定使用哪些工具
- 客户端通过 MCP 服务器执行选定的工具
- 结果返回给 Claude
- Claude 生成自然语言响应
- 响应显示给你!
故障排除
天气 API 问题
错误:无法获取网格点数据
这通常意味着:
- 坐标在美国境外
- NWS API 出现问题
- 你被限制了请求频率
解决方案:
- 验证你使用的是美国境内的坐标
- 在请求之间添加小的延迟
- 检查 NWS API 状态页面
错误:[州] 没有活动预警
这不是错误 - 这只是意味着该州目前没有天气预警。可以尝试查询其他州或在恶劣天气期间检查。
Claude for Desktop 集成问题
服务器未在 Claude 中显示
- 检查配置文件语法
- 确保项目路径正确
- 完全重启 Claude for Desktop
你也可以这样检查 Claude 的日志:
# 检查 Claude 的错误日志
tail -n 20 -f ~/Library/Logs/Claude/mcp*.log
工具调用静默失败
如果 Claude 尝试使用工具但失败了:
- 检查 Claude 的错误日志
- 验证你的服务器运行无误
- 尝试重启 Claude for Desktop