Für Server-Entwickler
In diesem Tutorial erstellen wir einen einfachen MCP-Wetterserver und verbinden ihn mit einem Host, Claude for Desktop. Wir beginnen mit einem grundlegenden Setup und gehen dann zu komplexeren Anwendungsfällen über.
Was wir erstellen werden
Viele LLMs (einschließlich Claude) haben derzeit nicht die Fähigkeit, Wettervorhersagen und schwere Wetterwarnungen abzurufen. Lassen Sie uns MCP verwenden, um das zu lösen!
Wir erstellen einen Server, der zwei Tools bereitstellt: get-alerts und get-forecast. Dann verbinden wir den Server mit einem MCP-Host (in diesem Fall Claude for Desktop):
Warum Claude for Desktop und nicht Claude.ai?
Kernkonzepte von MCP
MCP‑Server können drei Haupttypen von Fähigkeiten bereitstellen:
- Resources: Dateiähnliche Daten, die von Clients gelesen werden können (z. B. API‑Antworten oder Dateiinhalte)
- Tools: Funktionen, die vom LLM aufgerufen werden können (mit Nutzerfreigabe)
- Prompts: Vorgefertigte Vorlagen, die Nutzern helfen, bestimmte Aufgaben zu erledigen
Dieses Tutorial konzentriert sich hauptsächlich auf Tools.
Legen wir los und bauen unseren Wetter‑Server! Den vollständigen Beispielcode finden Sie hier.
Vorkenntnisse
Dieser Quickstart setzt Grundkenntnisse voraus in:
- Python
- LLMs like Claude
Systemanforderungen
- Python 3.10 oder höher installiert.
- Python MCP SDK 1.2.0 oder höher verwenden.
Umgebung einrichten
Zuerst installieren wir uv und richten Projekt und Umgebung ein:
uv installieren
curl -LsSf https://astral.sh/uv/install.sh | shpowershell -ExecutionPolicy ByPass -c "irm https://astral.sh/uv/install.ps1 | iex"Starten Sie anschließend Ihr Terminal neu, damit der Befehl uv erkannt wird.
Erstellen und konfigurieren wir nun unser Projekt:
Projekt erstellen
# Neues Projektverzeichnis erstellen
uv init weather
cd weather

# Virtuelle Umgebung erstellen und aktivieren
uv venv
source .venv/bin/activate

# Abhängigkeiten installieren
uv add "mcp[cli]" httpx

# Serverdatei erstellen
touch weather.py
# Neues Projektverzeichnis erstellen
uv init weather
cd weather
# Virtuelle Umgebung erstellen und aktivieren
uv venv
.venv\Scripts\activate
# Abhängigkeiten installieren
uv add mcp[cli] httpx
# Serverdatei erstellen
new-item weather.pyJetzt bauen wir Ihren Server.
Server erstellen
Pakete importieren und Instanz einrichten
Fügen Sie Folgendes am Anfang Ihrer weather.py hinzu:
from typing import Any
import httpx
from mcp.server.fastmcp import FastMCP

# Initialize FastMCP server
mcp = FastMCP("weather")

# Constants
NWS_API_BASE = "https://api.weather.gov"
USER_AGENT = "weather-app/1.0"
Die Klasse FastMCP nutzt Python‑Type‑Hints und Docstrings, um Tool‑Definitionen automatisch zu erzeugen – das vereinfacht Erstellung und Pflege von MCP‑Tools.
Hilfsfunktionen
Als Nächstes fügen wir Hilfsfunktionen hinzu, um Daten der National Weather Service API abzufragen und aufzubereiten:
async def make_nws_request(url: str) -> dict[str, Any] | None:
    """Make a request to the NWS API with proper error handling."""
    headers = {
        "User-Agent": USER_AGENT,
        "Accept": "application/geo+json"
    }
    async with httpx.AsyncClient() as client:
        try:
            response = await client.get(url, headers=headers, timeout=30.0)
            response.raise_for_status()
            return response.json()
        except Exception:
            return None

def format_alert(feature: dict) -> str:
    """Format an alert feature into a readable string."""
    props = feature["properties"]
    return f"""
Event: {props.get('event', 'Unknown')}
Area: {props.get('areaDesc', 'Unknown')}
Severity: {props.get('severity', 'Unknown')}
Description: {props.get('description', 'No description available')}
Instructions: {props.get('instruction', 'No specific instructions provided')}
"""
Tool‑Ausführung implementieren
Der Ausführungshandler übernimmt die eigentliche Logik der Tools. Fügen wir ihn hinzu:
@mcp.tool()
async def get_alerts(state: str) -> str:
    """Get weather alerts for a US state.

    Args:
        state: Two-letter US state code (e.g. CA, NY)
    """
    url = f"{NWS_API_BASE}/alerts/active/area/{state}"
    data = await make_nws_request(url)

    if not data or "features" not in data:
        return "Unable to fetch alerts or no alerts found."

    if not data["features"]:
        return "No active alerts for this state."

    alerts = [format_alert(feature) for feature in data["features"]]
    return "\n---\n".join(alerts)

@mcp.tool()
async def get_forecast(latitude: float, longitude: float) -> str:
    """Get weather forecast for a location.

    Args:
        latitude: Latitude of the location
        longitude: Longitude of the location
    """
    # First get the forecast grid endpoint
    points_url = f"{NWS_API_BASE}/points/{latitude},{longitude}"
    points_data = await make_nws_request(points_url)

    if not points_data:
        return "Unable to fetch forecast data for this location."

    # Get the forecast URL from the points response
    forecast_url = points_data["properties"]["forecast"]
    forecast_data = await make_nws_request(forecast_url)

    if not forecast_data:
        return "Unable to fetch detailed forecast."

    # Format the periods into a readable forecast
    periods = forecast_data["properties"]["periods"]
    forecasts = []
    for period in periods[:5]:  # Only show next 5 periods
        forecast = f"""
{period['name']}:
Temperature: {period['temperature']}°{period['temperatureUnit']}
Wind: {period['windSpeed']} {period['windDirection']}
Forecast: {period['detailedForecast']}
"""
        forecasts.append(forecast)

    return "\n---\n".join(forecasts)
Server ausführen
Finally, let’s initialize and run the server:
if __name__ == "__main__":
    # Initialize and run the server
    mcp.run(transport='stdio')
Your server is complete! Run uv run weather.py to confirm that everything’s working.
Testen wir den Server nun mit einem bestehenden MCP‑Host, Claude for Desktop.
Server mit Claude for Desktop testen
Stellen Sie zunächst sicher, dass Claude for Desktop installiert ist. You can install the latest version here. If you already have Claude for Desktop, make sure it’s updated to the latest version.
Konfigurieren Sie Claude for Desktop für die MCP‑Server, die Sie verwenden möchten. Öffnen Sie dazu die Konfigurationsdatei ~/Library/Application Support/Claude/claude_desktop_config.json in einem Editor. Legen Sie die Datei an, falls sie nicht existiert.
For example, if you have VS Code installed:
Konfigurationsdatei öffnen
code ~/Library/Application\ Support/Claude/claude_desktop_config.jsoncode $env:AppData\Claude\claude_desktop_config.jsonFügen Sie Ihre Server unter dem Schlüssel mcpServers hinzu. MCP‑UI‑Elemente erscheinen in Claude for Desktop nur, wenn mindestens ein Server korrekt konfiguriert ist.
In diesem Beispiel fügen wir den einzelnen Wetter‑Server wie folgt hinzu:
Configure Claude for Desktop
{
    "mcpServers": {
        "weather": {
            "command": "uv",
            "args": [
                "--directory",
                "/ABSOLUTE/PATH/TO/PARENT/FOLDER/weather",
                "run",
                "weather.py"
            ]
        }
    }
}
{
"mcpServers": {
"weather": {
"command": "uv",
"args": [
"--directory",
"C:\\ABSOLUTE\\PATH\\TO\\PARENT\\FOLDER\\weather",
"run",
"weather.py"
]
}
}
}uv executable in the command field. You can get this by running which uv on MacOS/Linux or where uv on Windows.Damit teilen Sie Claude for Desktop mit:
- There’s an MCP server named “weather”
- To launch it by running
uv --directory /ABSOLUTE/PATH/TO/PARENT/FOLDER/weather run weather
Speichern Sie die Datei und starten Sie Claude for Desktop neu.
Let’s get started with building our weather server! You can find the complete code for what we’ll be building here.
Vorkenntnisse
Dieser Quickstart setzt Grundkenntnisse voraus in:
- TypeScript
- LLMs like Claude
Systemanforderungen
For TypeScript, make sure you have the latest version of Node installed.
Umgebung einrichten
First, let’s install Node.js and npm if you haven’t already. You can download them from nodejs.org. Verify your Node.js installation:
node --version
npm --version
For this tutorial, you’ll need Node.js version 16 or higher.
Erstellen und konfigurieren wir nun unser Projekt:
Projekt erstellen
# Neues Projektverzeichnis erstellen
mkdir weather
cd weather

# Initialize a new npm project
npm init -y

# Abhängigkeiten installieren
npm install @modelcontextprotocol/sdk zod
npm install -D @types/node typescript

# Create our files
mkdir src
touch src/index.ts
# Neues Projektverzeichnis erstellen
md weather
cd weather
# Initialize a new npm project
npm init -y
# Abhängigkeiten installieren
npm install @modelcontextprotocol/sdk zod
npm install -D @types/node typescript
# Create our files
md src
new-item src\index.tsUpdate your package.json to add type: “module” and a build script:
{
  "type": "module",
  "bin": {
    "weather": "./build/index.js"
  },
  "scripts": {
    "build": "tsc && node -e \"require('fs').chmodSync('build/index.js', '755')\"",
  },
  "files": [
    "build"
  ],
}
Create a tsconfig.json in the root of your project:
{
  "compilerOptions": {
    "target": "ES2022",
    "module": "Node16",
    "moduleResolution": "Node16",
    "outDir": "./build",
    "rootDir": "./src",
    "strict": true,
    "esModuleInterop": true,
    "skipLibCheck": true,
    "forceConsistentCasingInFileNames": true
  },
  "include": ["src/**/*"],
  "exclude": ["node_modules"]
}
Jetzt bauen wir Ihren Server.
Server erstellen
Pakete importieren und Instanz einrichten
Add these to the top of your src/index.ts:
import { McpServer } from "@modelcontextprotocol/sdk/server/mcp.js";
import { StdioServerTransport } from "@modelcontextprotocol/sdk/server/stdio.js";
import { z } from "zod";

const NWS_API_BASE = "https://api.weather.gov";
const USER_AGENT = "weather-app/1.0";

// Create server instance
const server = new McpServer({
  name: "weather",
  version: "1.0.0",
});
Hilfsfunktionen
Als Nächstes fügen wir Hilfsfunktionen hinzu, um Daten der National Weather Service API abzufragen und aufzubereiten:
// Helper function for making NWS API requests
async function makeNWSRequest<T>(url: string): Promise<T | null> {
  const headers = {
    "User-Agent": USER_AGENT,
    Accept: "application/geo+json",
  };

  try {
    const response = await fetch(url, { headers });
    if (!response.ok) {
      throw new Error(`HTTP error! status: ${response.status}`);
    }
    return (await response.json()) as T;
  } catch (error) {
    console.error("Error making NWS request:", error);
    return null;
  }
}

interface AlertFeature {
  properties: {
    event?: string;
    areaDesc?: string;
    severity?: string;
    status?: string;
    headline?: string;
  };
}

// Format alert data
function formatAlert(feature: AlertFeature): string {
  const props = feature.properties;
  return [
    `Event: ${props.event || "Unknown"}`,
    `Area: ${props.areaDesc || "Unknown"}`,
    `Severity: ${props.severity || "Unknown"}`,
    `Status: ${props.status || "Unknown"}`,
    `Headline: ${props.headline || "No headline"}`,
    "---",
  ].join("\n");
}

interface ForecastPeriod {
  name?: string;
  temperature?: number;
  temperatureUnit?: string;
  windSpeed?: string;
  windDirection?: string;
  shortForecast?: string;
}

interface AlertsResponse {
  features: AlertFeature[];
}

interface PointsResponse {
  properties: {
    forecast?: string;
  };
}

interface ForecastResponse {
  properties: {
    periods: ForecastPeriod[];
  };
}
Tool‑Ausführung implementieren
Der Ausführungshandler übernimmt die eigentliche Logik der Tools. Fügen wir ihn hinzu:
// Register weather tools
server.tool(
  "get-alerts",
  "Get weather alerts for a state",
  {
    state: z.string().length(2).describe("Two-letter state code (e.g. CA, NY)"),
  },
  async ({ state }) => {
    const stateCode = state.toUpperCase();
    const alertsUrl = `${NWS_API_BASE}/alerts?area=${stateCode}`;
    const alertsData = await makeNWSRequest<AlertsResponse>(alertsUrl);

    if (!alertsData) {
      return {
        content: [
          {
            type: "text",
            text: "Failed to retrieve alerts data",
          },
        ],
      };
    }

    const features = alertsData.features || [];
    if (features.length === 0) {
      return {
        content: [
          {
            type: "text",
            text: `No active alerts for ${stateCode}`,
          },
        ],
      };
    }

    const formattedAlerts = features.map(formatAlert);
    const alertsText = `Active alerts for ${stateCode}:\n\n${formattedAlerts.join("\n")}`;

    return {
      content: [
        {
          type: "text",
          text: alertsText,
        },
      ],
    };
  },
);

server.tool(
  "get-forecast",
  "Get weather forecast for a location",
  {
    latitude: z.number().min(-90).max(90).describe("Latitude of the location"),
    longitude: z.number().min(-180).max(180).describe("Longitude of the location"),
  },
  async ({ latitude, longitude }) => {
    // Get grid point data
    const pointsUrl = `${NWS_API_BASE}/points/${latitude.toFixed(4)},${longitude.toFixed(4)}`;
    const pointsData = await makeNWSRequest<PointsResponse>(pointsUrl);

    if (!pointsData) {
      return {
        content: [
          {
            type: "text",
            text: `Failed to retrieve grid point data for coordinates: ${latitude}, ${longitude}. This location may not be supported by the NWS API (only US locations are supported).`,
          },
        ],
      };
    }

    const forecastUrl = pointsData.properties?.forecast;
    if (!forecastUrl) {
      return {
        content: [
          {
            type: "text",
            text: "Failed to get forecast URL from grid point data",
          },
        ],
      };
    }

    // Get forecast data
    const forecastData = await makeNWSRequest<ForecastResponse>(forecastUrl);
    if (!forecastData) {
      return {
        content: [
          {
            type: "text",
            text: "Failed to retrieve forecast data",
          },
        ],
      };
    }

    const periods = forecastData.properties?.periods || [];
    if (periods.length === 0) {
      return {
        content: [
          {
            type: "text",
            text: "No forecast periods available",
          },
        ],
      };
    }

    // Format forecast periods
    const formattedForecast = periods.map((period: ForecastPeriod) =>
      [
        `${period.name || "Unknown"}:`,
        `Temperature: ${period.temperature || "Unknown"}°${period.temperatureUnit || "F"}`,
        `Wind: ${period.windSpeed || "Unknown"} ${period.windDirection || ""}`,
        `${period.shortForecast || "No forecast available"}`,
        "---",
      ].join("\n"),
    );

    const forecastText = `Forecast for ${latitude}, ${longitude}:\n\n${formattedForecast.join("\n")}`;

    return {
      content: [
        {
          type: "text",
          text: forecastText,
        },
      ],
    };
  },
);
Server ausführen
Finally, implement the main function to run the server:
async function main() {
  const transport = new StdioServerTransport();
  await server.connect(transport);
  console.error("Weather MCP Server running on stdio");
}

main().catch((error) => {
  console.error("Fatal error in main():", error);
  process.exit(1);
});
Make sure to run npm run build to build your server! This is a very important step in getting your server to connect.
Testen wir den Server nun mit einem bestehenden MCP‑Host, Claude for Desktop.
Server mit Claude for Desktop testen
Stellen Sie zunächst sicher, dass Claude for Desktop installiert ist. You can install the latest version here. If you already have Claude for Desktop, make sure it’s updated to the latest version.
Konfigurieren Sie Claude for Desktop für die MCP‑Server, die Sie verwenden möchten. Öffnen Sie dazu die Konfigurationsdatei ~/Library/Application Support/Claude/claude_desktop_config.json in einem Editor. Legen Sie die Datei an, falls sie nicht existiert.
For example, if you have VS Code installed:
Configure Claude for Desktop
code ~/Library/Application\ Support/Claude/claude_desktop_config.jsoncode $env:AppData\Claude\claude_desktop_config.jsonFügen Sie Ihre Server unter dem Schlüssel mcpServers hinzu. MCP‑UI‑Elemente erscheinen in Claude for Desktop nur, wenn mindestens ein Server korrekt konfiguriert ist.
In diesem Beispiel fügen wir den einzelnen Wetter‑Server wie folgt hinzu:
Claude for Desktop konfigurieren
{
    "mcpServers": {
        "weather": {
            "command": "node",
            "args": [
                "/ABSOLUTE/PATH/TO/PARENT/FOLDER/weather/build/index.js"
            ]
        }
    }
}
{
"mcpServers": {
"weather": {
"command": "node",
"args": [
"C:\\PATH\\TO\\PARENT\\FOLDER\\weather\\build\\index.js"
]
}
}
}Damit teilen Sie Claude for Desktop mit:
- There’s an MCP server named “weather”
- Launch it by running
node /ABSOLUTE/PATH/TO/PARENT/FOLDER/weather/build/index.js
Speichern Sie die Datei und starten Sie Claude for Desktop neu.
Let’s get started with building our weather server! You can find the complete code for what we’ll be building here.
For more information, see the MCP Server Boot Starter reference documentation. For manual MCP Server implementation, refer to the MCP Server Java SDK documentation.
Systemanforderungen
- Java 17 or higher installed.
- Spring Boot 3.3.x or higher
Umgebung einrichten
Use the Spring Initizer to bootstrat the project.
You will need to add the following dependencies:
dependencies
<dependencies>
      <dependency>
          <groupId>org.springframework.ai</groupId>
          <artifactId>spring-ai-mcp-server-spring-boot-starter</artifactId>
      </dependency>

      <dependency>
          <groupId>org.springframework</groupId>
          <artifactId>spring-web</artifactId>
      </dependency>
</dependencies>
dependencies {
implementation platform("org.springframework.ai:spring-ai-mcp-server-spring-boot-starter")
implementation platform("org.springframework:spring-web")
}Then configure your application by setting the applicaiton properties:
configure application
spring.main.bannerMode=off
logging.pattern.console=logging:
pattern:
console:
spring:
main:
banner-mode: offThe Server Configuration Properties documents all available properties.
Jetzt bauen wir Ihren Server.
Server erstellen
Weather Service
Let’s implement a WeatheService.java that uses a REST client to query the data from the National Weather Service API:
@Service
public class WeatherService {

	private final RestClient restClient;

	public WeatherService() {
		this.restClient = RestClient.builder()
			.baseUrl("https://api.weather.gov")
			.defaultHeader("Accept", "application/geo+json")
			.defaultHeader("User-Agent", "WeatherApiClient/1.0 ([email protected])")
			.build();
	}

  @Tool(description = "Get weather forecast for a specific latitude/longitude")
  public String getWeatherForecastByLocation(
      double latitude,   // Latitude coordinate
      double longitude   // Longitude coordinate
  ) {
      // Returns detailed forecast including:
      // - Temperature and unit
      // - Wind speed and direction
      // - Detailed forecast description
  }

  @Tool(description = "Get weather alerts for a US state")
  public String getAlerts(
      @ToolParam(description = "Two-letter US state code (e.g. CA, NY") String state)
  ) {
      // Returns active alerts including:
      // - Event type
      // - Affected area
      // - Severity
      // - Description
      // - Safety instructions
  }

  // ......
}
The @Service annotation with auto-register the service in your applicaiton context.
The Spring AI @Tool annotation, making it easy to create and maintain MCP tools.
The auto-configuration will automatically register these tools with the MCP server.
Create your Boot Applicaiton
@SpringBootApplication
public class McpServerApplication {

	public static void main(String[] args) {
		SpringApplication.run(McpServerApplication.class, args);
	}

	@Bean
	public ToolCallbackProvider weatherTools(WeatherService weatherService) {
		return  MethodToolCallbackProvider.builder().toolObjects(weatherService).build();
	}
}
Uses the the MethodToolCallbackProvider utils to convert the @Tools into actionalble callbackes used by the MCP server.
Server ausführen
Abschließend bauen wir den Server:
./mvnw clean installDadurch entsteht im Ordner target die Datei mcp-weather-stdio-server-0.0.1-SNAPSHOT.jar.
Testen wir den Server nun mit einem bestehenden MCP‑Host, Claude for Desktop.
Server mit Claude for Desktop testen
Stellen Sie zunächst sicher, dass Claude for Desktop installiert ist. Die aktuelle Version erhalten Sie hier. Falls bereits installiert, aktualisieren Sie bitte auf die neueste Version.
Konfigurieren Sie Claude for Desktop für die MCP‑Server, die Sie verwenden möchten.
Öffnen Sie dazu die Konfigurationsdatei ~/Library/Application Support/Claude/claude_desktop_config.json in einem Editor.
Legen Sie die Datei an, falls sie nicht existiert.
For example, if you have VS Code installed:
Konfigurationsdatei öffnen
code ~/Library/Application\ Support/Claude/claude_desktop_config.jsoncode $env:AppData\Claude\claude_desktop_config.jsonFügen Sie Ihre Server unter dem Schlüssel mcpServers hinzu.
MCP‑UI‑Elemente erscheinen in Claude for Desktop nur, wenn mindestens ein Server korrekt konfiguriert ist.
In diesem Beispiel fügen wir den einzelnen Wetter‑Server wie folgt hinzu:
Einzelnen Wetter‑Server hinzufügen
{
  "mcpServers": {
    "spring-ai-mcp-weather": {
      "command": "java",
      "args": [
        "-Dspring.ai.mcp.server.stdio=true",
        "-jar",
        "/ABSOLUTE/PATH/TO/PARENT/FOLDER/mcp-weather-stdio-server-0.0.1-SNAPSHOT.jar"
      ]
    }
  }
}
{
"mcpServers": {
"spring-ai-mcp-weather": {
"command": "java",
"args": [
"-Dspring.ai.mcp.server.transport=STDIO",
"-jar",
"C:\\ABSOLUTE\\PATH\\TO\\PARENT\\FOLDER\\weather\\mcp-weather-stdio-server-0.0.1-SNAPSHOT.jar"
]
}
}
}Damit teilen Sie Claude for Desktop mit:
- Es gibt einen MCP‑Server namens “my-weather-server”
- Er wird mit
java -jar /ABSOLUTE/PATH/TO/PARENT/FOLDER/mcp-weather-stdio-server-0.0.1-SNAPSHOT.jargestartet
Speichern Sie die Datei und starten Sie Claude for Desktop neu.
Server mit Java‑Client testen
MCP‑Client manuell erstellen
Verwenden Sie McpClient, um sich mit dem Server zu verbinden:
var stdioParams = ServerParameters.builder("java")
  .args("-jar", "/ABSOLUTE/PATH/TO/PARENT/FOLDER/mcp-weather-stdio-server-0.0.1-SNAPSHOT.jar")
  .build();

var stdioTransport = new StdioClientTransport(stdioParams);

var mcpClient = McpClient.sync(stdioTransport).build();

mcpClient.initialize();

ListToolsResult toolsList = mcpClient.listTools();

CallToolResult weather = mcpClient.callTool(
  new CallToolRequest("getWeatherForecastByLocation",
      Map.of("latitude", "47.6062", "longitude", "-122.3321")));

CallToolResult alert = mcpClient.callTool(
  new CallToolRequest("getAlerts", Map.of("state", "NY")));

mcpClient.closeGracefully();
Use MCP Client Boot Starter
Create a new boot starter applicaiton using the spring-ai-mcp-client-spring-boot-starter dependency:
<dependency>
    <groupId>org.springframework.ai</groupId>
    <artifactId>spring-ai-mcp-client-spring-boot-starter</artifactId>
</dependency>
and set the spring.ai.mcp.client.stdio.servers-configuration property to point to your claude_desktop_config.json.
You can re-use the existing Anthropic Destop configuration:
spring.ai.mcp.client.stdio.servers-configuration=file:PATH/TO/claude_desktop_config.jsonWhen you stasrt your client applicaiton, the auto-configuration will create, automatically MCP clients from the claude_desktop_config.json.
For more information, see the MCP Client Boot Starters reference documentation.
More Java MCP Server examples
The starter-webflux-server demonstrates how to create a MCP server using SSE transport. It showcases how to define and register MCP Tools, Resources, and Prompts, using the Spring Boot’s auto-configuration capabilities.
Test with commands
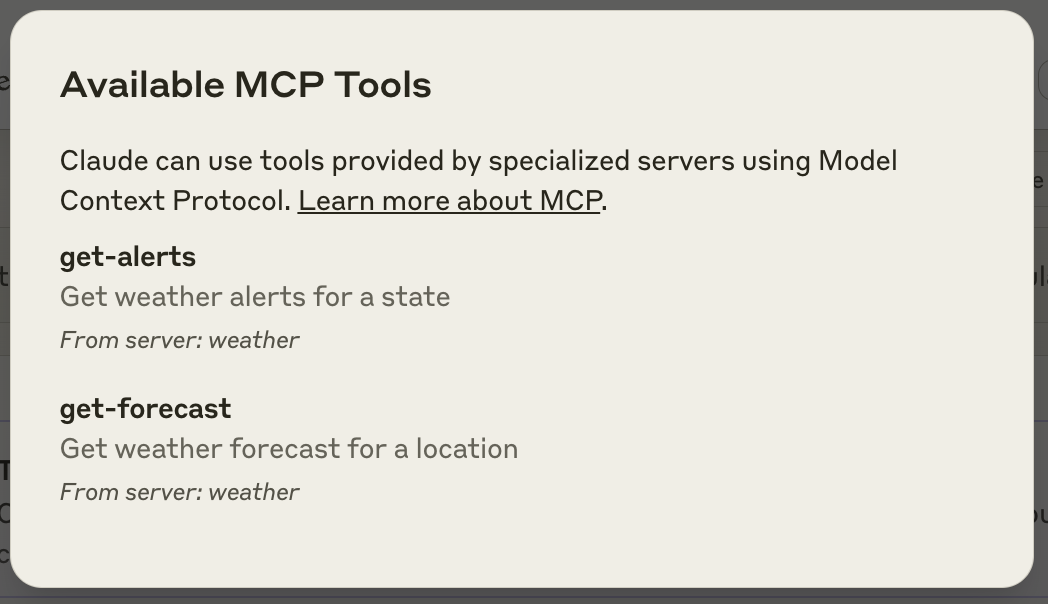
Let’s make sure Claude for Desktop is picking up the two tools we’ve exposed in our weather server. You can do this by looking for the hammer![]()
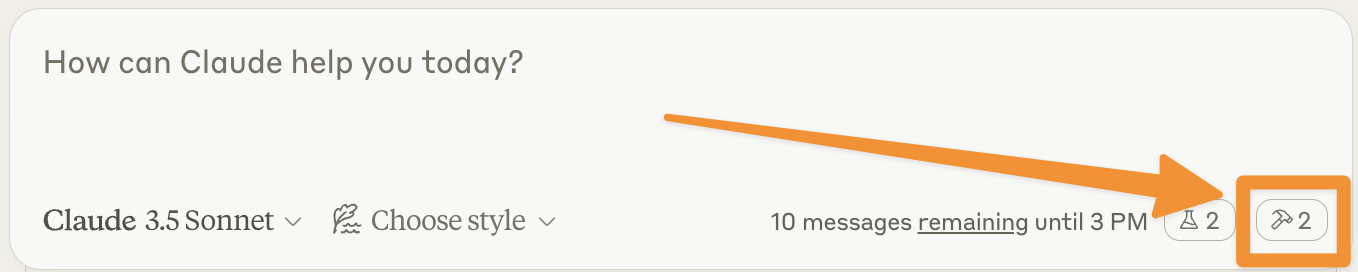
After clicking on the hammer icon, you should see two tools listed:
If your server isn’t being picked up by Claude for Desktop, proceed to the Troubleshooting section for debugging tips.
If the hammer icon has shown up, you can now test your server by running the following commands in Claude for Desktop:
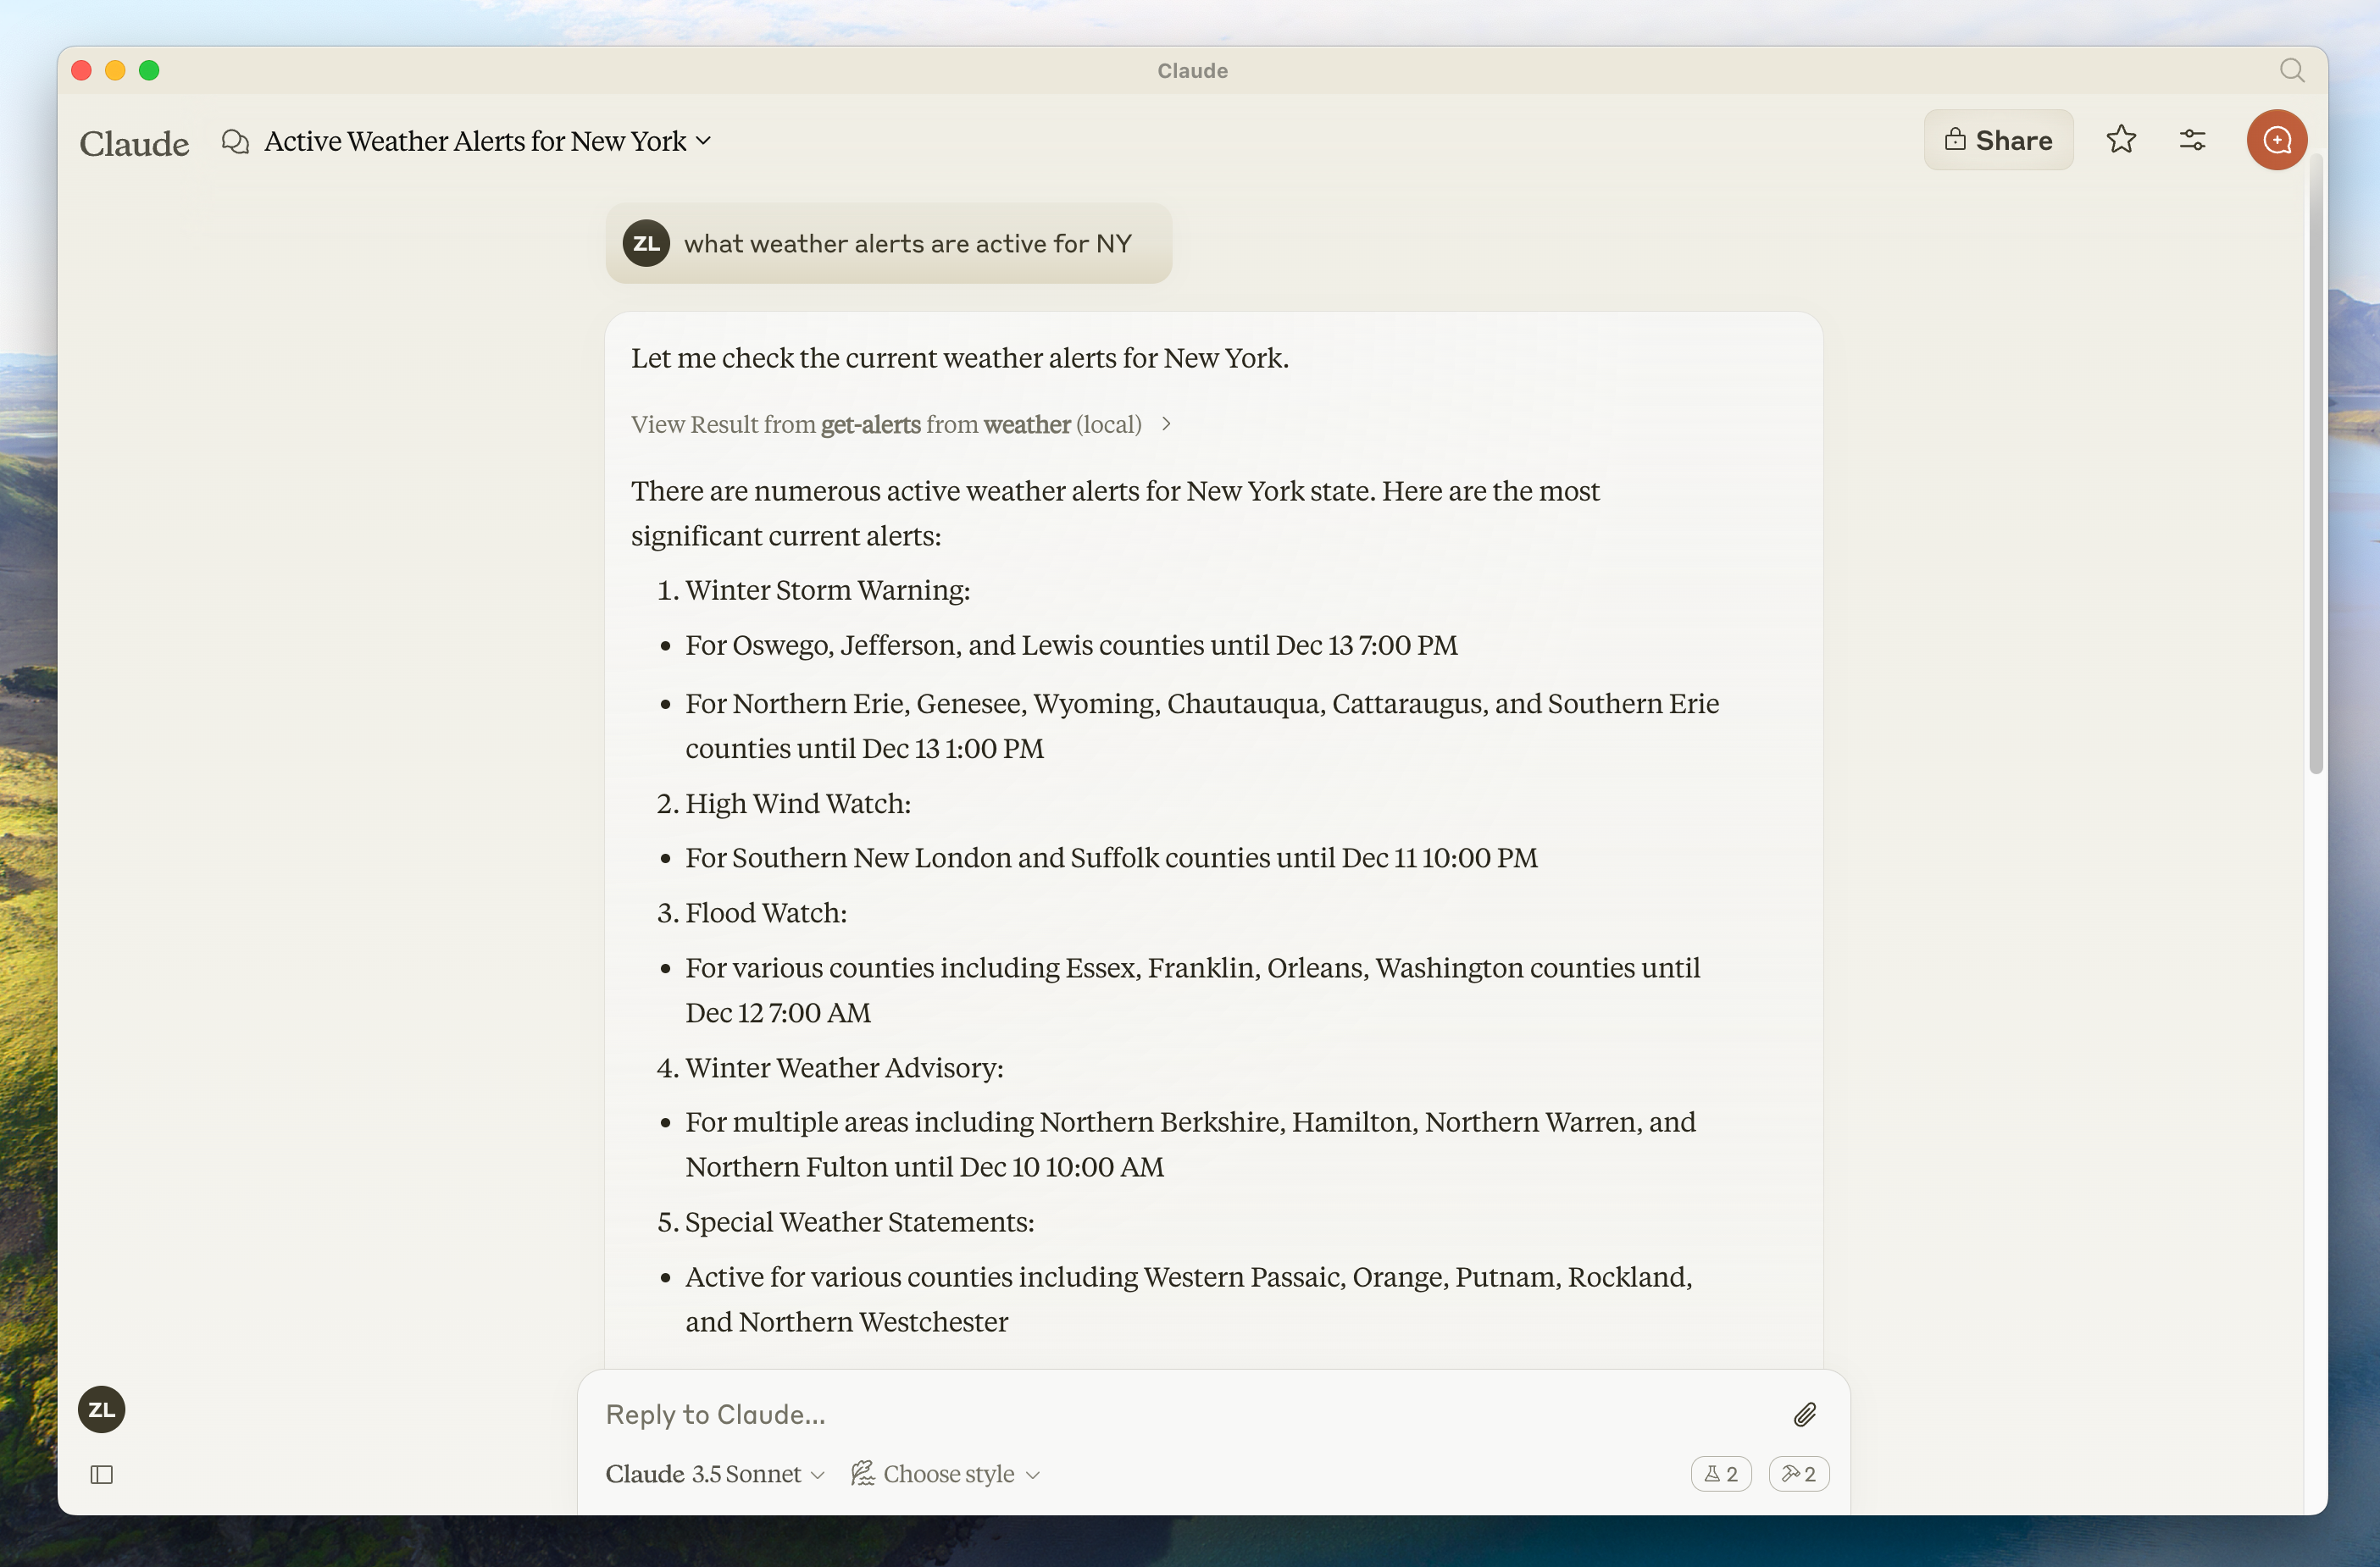
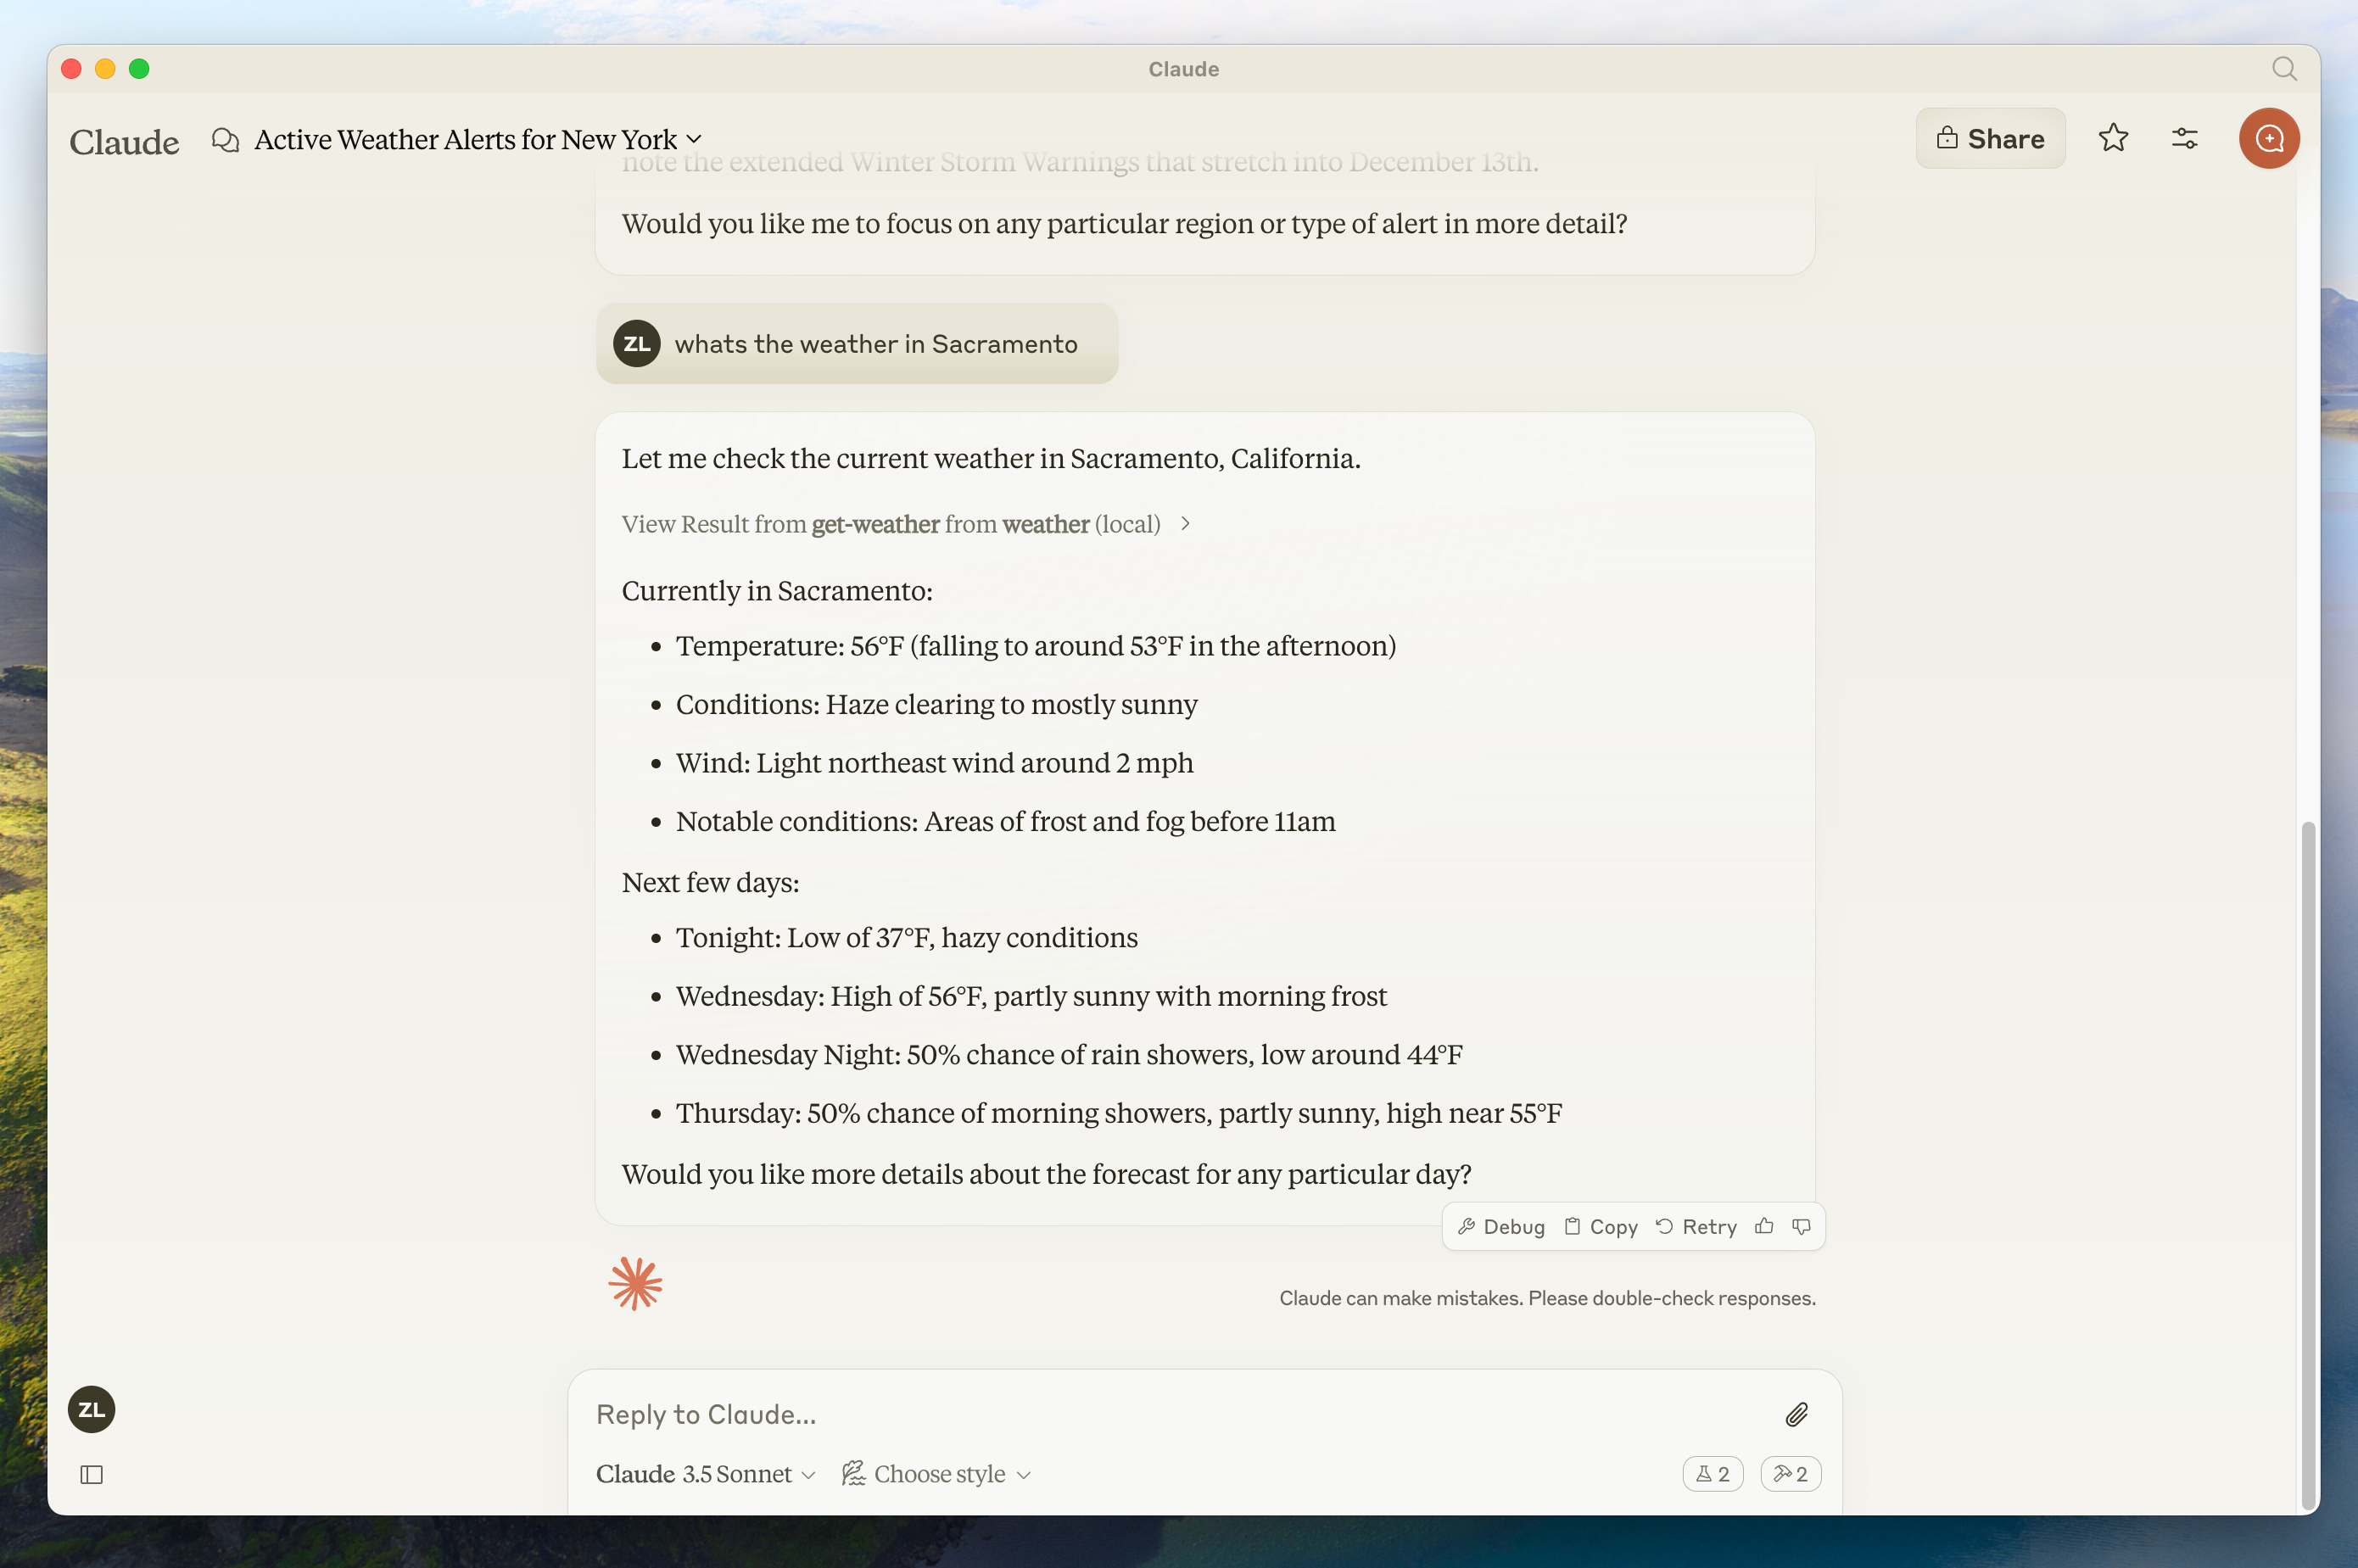
- What’s the weather in Sacramento?
- What are the active weather alerts in Texas?
What’s happening under the hood
When you ask a question:
- The client sends your question to Claude
- Claude analyzes the available tools and decides which one(s) to use
- The client executes the chosen tool(s) through the MCP server
- The results are sent back to Claude
- Claude formulates a natural language response
- The response is displayed to you!
Troubleshooting
Claude for Desktop Integration Issues
Getting logs from Claude for Desktop
Claude.app logging related to MCP is written to log files in ~/Library/Logs/Claude:
mcp.logwill contain general logging about MCP connections and connection failures.- Files named
mcp-server-SERVERNAME.logwill contain error (stderr) logging from the named server.
You can run the following command to list recent logs and follow along with any new ones:
# Check Claude's logs for errors
tail -n 20 -f ~/Library/Logs/Claude/mcp*.log
Server not showing up in Claude
- Check your
claude_desktop_config.jsonfile syntax - Make sure the path to your project is absolute and not relative
- Restart Claude for Desktop completely
Tool calls failing silently
If Claude attempts to use the tools but they fail:
- Check Claude’s logs for errors
- Verify your server builds and runs without errors
- Try restarting Claude for Desktop
None of this is working. What do I do?
Please refer to our debugging guide for better debugging tools and more detailed guidance.
Weather API Issues
Error: Failed to retrieve grid point data
This usually means either:
- The coordinates are outside the US
- The NWS API is having issues
- You’re being rate limited
Fix:
- Verify you’re using US coordinates
- Add a small delay between requests
- Check the NWS API status page
Error: No active alerts for [STATE]
This isn’t an error - it just means there are no current weather alerts for that state. Try a different state or check during severe weather.